|
This month's topic for Reefkeeping 101 is sumps. Although they can be as complicated as you want to make them, it is possible to set up a simple sump that will improve your reef's health and get some gear out of the display tank.
Ten years ago, I set up a 29-gallon aquarium in my home. It was pretty basic, emulating the same method my father had used: a glass tank, an undergravel filter with riser tubes, crushed coral substrate, powerheads, a heater and a Skilter protein skimmer. Yep, that tank rocked! Looking into my tank, I saw tubes, strainers, the heater, powerheads, wiring and… oh yeah, some rock, some fish and lots of algae. I'd purchased all the bottles of additives my local fish store had recommended to me, but they didn't solve my algae issues or make my tank look any prettier than it had before.
The first step in the right direction was to consider what kind of water I was using (Have you read Waterkeeper's article yet?), so I got an RO/DI system and checked it off the list.
It took me nearly five years to get around to learning about sumps, mainly because my tank wasn't drilled. In retrospect, I can't believe how long I waited. Hopefully, this article will remove any confusion you may have. If you think this topic is just a big headache or a disaster waiting to happen, let me assure you that with proper planning, sumps are well worth the effort.
What’s a Sump?
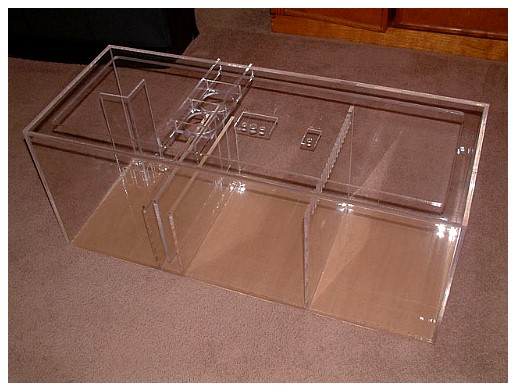
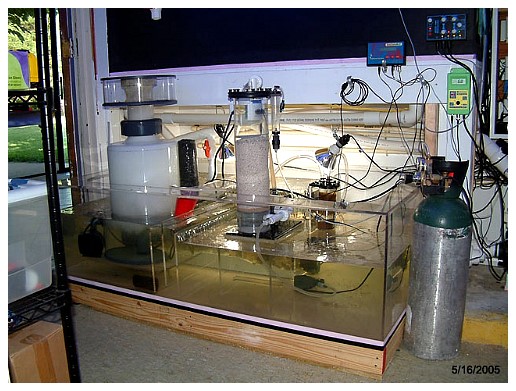
A sump is the term used to describe any type of container used beneath or behind an aquarium. It holds water and provides a location to place various pieces of equipment that our systems need. When guests visit we want them to appreciate the livestock in as natural a setting as possible, without a bunch of cumbersome devices scattered throughout the tank. Sumps can be built out of glass, acrylic, HDPE food-grade plastic or livestock feeding troughs. How much space you have to work with usually dictates which material is the best choice.
If the sump has to fit inside the stand under your aquarium, then the usual choices are a glass tank, an acrylic tank or a Rubbermaid™ container. If the sump is located in a basement or if there is plenty of space behind the aquarium, a stock tank might be better. Each type of container has its advantages and disadvantages that should be considered, which I'll touch upon. But first, let's consider what equipment might go into a sump.
The most common items are a protein skimmer, heaters and a pump to push the water back up to the tank. Other equipment that might be used includes a calcium reactor, a denitrifier, a phosphate-removing reactor, a place for filtration media such as GAC (granulated activated carbon), a Kalkwasser reactor, various probes to measure common water values and an automated top-off system (float or switch). Wow, that's a lot of stuff! Each person's tank is set up differently, and not everyone uses the same equipment. For example, I didn't mention an ozonizer or a UV sterilizer; nor did I mention a chiller. You will ultimately choose what your system needs. Additionally, a refugium is something I highly recommend and have incorporated into each of my reef tanks over the past five years.
Terminology
In order to make it easier to converse about sumps, it is important that everyone use the same terminology when discussing their setup with others:
- Drain lines – plumbing that drains into the sump
- Return lines – plumbing used to push water back up to the display tank
- Return pump – a pump used to move water through the return lines from the sump to the tank
- Bubble trap – a series of baffles that help lessen or stop tiny bubbles from passing through the sump and back into the main display
- Bubble tower – a device used to trap bubbles created by the drain lines (video)
- Refugium – a zone designed to allow pods to breed without predation; an area to grow macroalgae
- Skimmer zone – the area where the protein skimmer is located
- Return zone – the area from which water is pumped back up to the display tank
I made this list is because I've had many conversations with people over the past few years and, invariably, I've had to decipher what they meant before I could help them. If we can speak a common language about sumps, we can pinpoint problem areas quickly. When I was first learning about sumps and looking at examples online, as well as at some local fish stores, it was confusing.
With that said, let's address a few common questions now.
How do I get water out of my tank and into the sump?
If the tank is “reef-ready,” it has been drilled and has an internal overflow. This is the preferred method, because all the owner has to do is connect plumbing to the bulkheads. With a reef-ready tank, you never need to think about how it will drain, because it does so automatically. The only concern is that no livestock get into that section because it might obstruct the drain. A strainer can prevent a disaster.
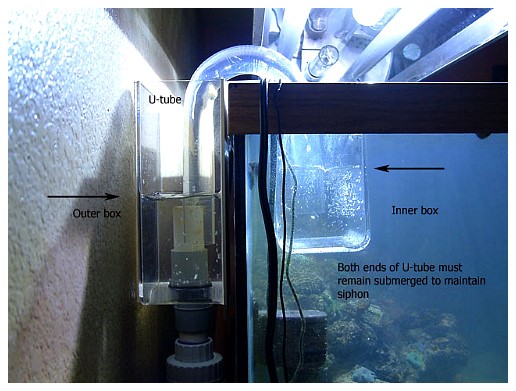
For tanks that are not drilled, a Hang-On-the-Back (HOB) overflow works by using the siphon method. A box is submerged inside the tank and a second box hangs on the outside of the tank. A U-tube siphons water from the inner box to the outer box, and from there water flows down a drain line to the sump. If the overflow box is set up correctly and designed properly, it will always maintain a siphon, even during a power outage.
It is imperative that HOB overflow users visually check the U-tube daily. If trapped air is accumulating at the top (or apex) of the U-tube, this should be dealt with immediately rather than later. If air continues to accumulate on a regular basis, perhaps the U-tube isn't seated properly, or perhaps the flow through the overflow box isn't fast enough to force those bubbles to flow right out the other end. See this article for tips on starting an overflow.
Using something (such as foam pipe insulation) to shield the U-tube from direct lighting helps reduce algae growth within it. Algae can cause an obstruction, thereby reducing the flow through the pipe and making it hard to see inside it. Once a day, lift the lid and check the U-tube. It takes only one second of your time to make sure it is working as it should. I had two tanks running like this for nearly three years and never had a problem. Be sure to clean out the inner box of any algae growth so the overflow can run without issue. If green hair algae are growing abundantly, they can obstruct the flow. If the water can't siphon quickly enough, the display tank will fill up more and more, and possibly overflow.
Snails can be a problem if they crawl into the overflow tube, because their shell can temporarily block the flow. Some gutter guard or eggcrate (lighting diffuser) can be cut to fit, which acts as a barrier to keep the snails out of that area.
Why do I even need a sump?
Sumps have many advantages:
- Increased total water volume - This dilutes the pollutants that accumulate in your tank’s water, and helps to slow issues that arise quickly in sumpless tanks.
- Skims the surface - No more surface scum, just crystal clear water.
- Lowers temperature - I've observed a 2°F drop in temperature after installing a sump.
- Hides equipment - Heaters, protein skimmers, monitoring probes, grounding probes and more can be moved to the sump and out of the display tank.
- Consistent water level - The display tank will maintain the same water level all the time; evaporation occurs in the sump over time.
- Safe place to pour in additives - Adding chemicals or reverse osmosis de-ionized (RO/DI) water in the sump allows it to mix before entering the display tank.
- Increased circulation - The return water from the sump is yet another way to move water in your tank. You can point the return outlet(s) in different directions to create some flow, reducing the need for some of the powerheads needed in your display tank.
- Increased oxygenation - As water drains into the sump, air mixes with it, allowing for beneficial gas exchange -- releasing CO2 and adding fresh O2.
- Refugium on reverse lighting - Helps maintain pH levels during the late night hours.
How do I know how large a sump I need?
My advice is always to squeeze in the largest sump that can be fit in the available space. The bigger the better, because increased water volume stabilizes your entire system. A stable system tends to promote excellent livestock health and growth. One of the perks of a big sump is the ability to house a lot of equipment and make it accessible. If any of the equipment leaks, it leaks in the sump, which means no water is wasted and your cabinet and floors stay dry.
The best way to determine how large a sump you can install is to create a template or mock-up of a sump using cardboard or foam. Navigate that template or mock-up into the stand, and verify that it will fit. If any room is left over, make the sump even bigger. There may be more than one way to get a sump into the stand, such as turning it up on end, sliding it in, and then turning it back into position. Another method is to pivot it in either from the front or perhaps from the back. Some hobbyists have lowered the sump into the stand prior to installing the tank on top. I've even cut the end out of a stand to slide the sump in via an access door. If the stand hasn't been built yet, plans can be made in advance to ensure that the sump will fit by making some parts removable. You might even consider making the stand larger than the tank, which not only creates space for the sump but also provides a ledge on all three sides of the tank to put something down when working in or around the tank. Plus, if you ever upgrade your tank, the stand might be the perfect size for the next, bigger, aquarium.
A sump that is too small increases the risk of an overflow if the power fails or if the return pump stops working. Small sumps make the hobby difficult. Equipment doesn't fit, evaporation rates quickly deplete water volume, microbubbles are a challenge to overcome and you have no space to work!
When deciding what size sump you need, it is good to know what you want to incorporate into it, as well as any items on your wish list. I've had people approach me with plans that include a skimmer section, a “very large” refugium, an auto top-off reservoir section, a propagation section, a tiny return section, plus various reactors they hope to insert wherever they can fit. Then they give me an area that is roughly 30" x 20" and expect it to work, magically. The reality is this: there is only so much room to work with, and it will quickly be used up. It’s better to pick what you need, and keep the sump simple and easy to work in.
How do I build it? What materials can I use?
Many aquarists build their sump by using a glass aquarium that fits inside the stand. For baffles, you can use glass or acrylic. Please be sure to use ¼" or thicker material, so that it will remain rigid and not bow or crack. When measuring what will fit into the sump, the glass or acrylic baffles should be ¼" less wide than the tank's internal width to avoid putting undue pressure on the glass walls, which can lead to tank failure. If you are getting glass cut at your local glass shop, pay a little extra to have the edges polished. This will avoid any cuts both during construction, and any time you reach into your sump for something.
Aquarium-safe silicone is inexpensive enough that I tell people to just buy a tube at their local fish store, rather than trying to find something even cheaper at Home Depot, Lowe's or Menard's, because some types of silicone contain anti-bacterial agents that are not beneficial to the bacterial life in your tank. The money you save by building your sump yourself more than offsets the $3 more you pay for the right stuff, instead of something that might be safe.
Once the tank has been cleaned and dried thoroughly, the baffles can be siliconed in place. Silicone will bond glass to glass, but it doesn't bond with acrylic. It will adhere to the glass walls, however, and keep the acrylic in place for a long time. Once done, let the silicone cure for 24 hours before getting it wet.
If you would like to build your very own custom sump using acrylic, my website contains lots of information about what tools to use and how to work with acrylic, and provides a variety of layouts that should help you determine what is best for your particular setup.
If you want to use a stock tank (such as those used for feeding and watering horses), I don't have any advice because I've never done it. You'll find threads, though, in the DIY forum on Reef Central that should provide some good guidelines. I do know that everyone complains that the built-in bulkheads are known to leak, so keep that mind. Here's a thread in which three vats were used.
Baffle height is dictated by the equipment used, the height of the sump itself, and the empty area necessary to hold excess water when the return pump is off. To have enough room to reach inside the sump, I recommend that it be 16" tall. The skimmer section is usually 9" tall, but you can make it shorter or taller based on what skimmer you're going to use. If the skimmer needs to sit in very shallow water, perhaps a small stand can be built and placed beneath it to allow it to sit nearer to the water's surface.
How big should my refugium be?
The refugium is a portion of the sump used to grow macroalgae so that nuisance algae can't take hold in the display tank. As the macroalgae grow, the hobbyist culls, or harvests, some of the plants every few weeks. This not only encourages growth from the remaining macroalgae, it also exports nitrate and other unwanted nutrients from the system, so they don't feed nuisance algae in the display tank. Another benefit is that the algae provide a nice area for pods to live and breed, safe from all predators. The refugium is not a place for fish, shrimp or crabs. One inch of sand (or more), some live rock rubble, perhaps, and some macroalgae such as Cheatomorpha are all that is necessary to create a very interesting and useful biotope in your reef system. A few snails can keep the surfaces clean in that zone, and a cucumber can keep the sand clean of detritus.
Some systems have huge dedicated refugiums tied into a multi-tank system. If space is limited, I recommend trying to create a section that is a minimum of 10% of the display tank's volume. My 280-gallon reef has a 29-gallon refugium, my 55-gallon reef had a 5-gallon refugium and my 29-gallon reef had a 10-gallon refugium. All three tanks benefited from that zone, and none suffered from common nuisance algae. Copepods, Mysis and mysids would breed, and their babies would flow into the display tank as a food source for the mandarins and other fish.
In the sumps I build, I make the refugium's water level 12" high. The baffle is 13" tall, with teeth cut 1" deep. If you would like to skip the teeth, you can glue or wedge a section of eggcrate along the top of the baffle to keep the macro algae in its zone.
A refugium needs some type of light over it for the macroalgae to grow. My preference is a 5100K spiral compact fluorescent bulb, which I run on a reverse photoperiod, from 10pm to 8am daily. (When I used to keep Caulerpa nummularia, I found that leaving the light on 24 hours a day prevented it from going sexual. It was an easy solution to an annoying problem.
I've heard that too much flow is a problem. Is that true?
In the past, many hobbyists purchased huge energy-demanding pumps to push water into their display tank and create tons of flow. Their goal was to use the return pump as the main flow in the aquarium so they didn't have to look at any powerheads in their display. While that sounds nice in theory, it doesn't work well for several reasons. The main reason is microbubbles. I've seen big, long sumps with a series of baffles and sponge blocks used to help fight those tiny bubbles and avoid the eyesore of white bubbles blowing all around their reef tank.
For years aquarists have set guidelines about how much flow a reef tank needs based upon the types of corals kept in it, but that flow rate has nothing to do with the water passing through the sump. If the sump is very small, a very slow return pump is best. If the sump is larger, it is possible to use a bigger pump and still have no problems. The general rule I recommend is to multiply the display tank’s volume by three or five, and get a pump that matches that number. If the display tank holds 100 gallons, a 500gph return pump is sufficient. If the aquarist puts a 40-gallon sump under that tank, 500gph flowing through it should be trouble-free.
The benefit of using a smaller return pump is threefold: less heat is added to the water, less electricity is consumed around the clock, and there is a far lower likelihood of having to deal with microbubbles. If you are trying to be “green” (environmentally conscious) or just want to save a little money, both on the initial purchase and the ongoing electricity use, getting a smaller return pump is the right choice. Flow in the display tank should be provided with powerheads, a closed loop or some type of stream pump - not the return pump.
What is the best return pump for my system?
Several brands are available, but I believe this question means more than that. If you are asking if it is better to have an internal (submersible) pump or an external one, my answer varies from tank to tank. I've always liked submersible pumps because they don't require the sump to be drilled; thus it is less likely to develop a leak someday. Having the pump located in the sump means that the sump will never leak, and if the plumbing connected to the pump ever leaks, it can simply drip back into the sump. However, submersible pumps can add heat, which needs to be considered. Supreme Mag pumps run warm, but that has never stopped me from using them. Eheim is a very good brand of pumps that add very little heat, plus they can even be used externally. Submersible pumps can sometimes be noisy, due to vibration against the sump's floor or walls. Some sponge, rubber or even cured silicone can be used to create a cushion beneath the pump to alleviate that problem.
The benefits of external pumps are that they add little or no heat to the water, and they often have more power. Hobbyists that have the sump in their basement and need to pump water up to the first floor of their home need a powerful pump to overcome the (vertical) head pressure. Others just really like external pumps and buy Panworld, Sequence or Iwaki pumps (to name a few). Having the pump outside of the sump does create new area for potential leaks from either the bulkhead, the plumbing or even the pump if a seal fails. External pumps are usually quiet. It is important that there be enough space around the pump to allow heat to dissipate. External pumps do take up space, which limits how large the sump can be if it’s located under the tank.
How do I plumb it?
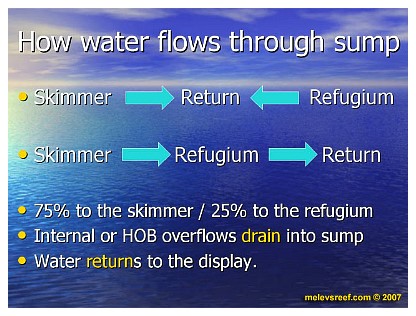
Plumbing is a big topic that could be an article all by itself. Some choices are rigid PVC, flexible PVC (called SpaFlex tubing), flexible vinyl tubing and corrugated plastic pool hose tubing. When plumbing the drain lines from the display tank using the type of plumbing you prefer, I suggest that 75% of the water draining from the tank pour into the skimmer section, and the other 25% pour into the refugium. The "raw" water in the skimmer section allows the protein skimmer to quickly take waste out of the system, while the "raw" water pouring into the refugium feeds both plants and pods. If your tank has only one drain line, you can still divide how the water drains by using some PVC fittings and a ball valve as shown in this picture. The water from those two zones will pour into the return zone, which is pumped back up to the display tank.
 |
When installing new plumbing, consider what method is the least restrictive that gets the job done and is flexible for future needs. Using unions allows you to remove sections of pipe later for cleaning or when the time comes to make changes. Where PVC pipe has been glued together, if the sections are long enough and a modification is required, you can easily cut the pipe and glue a new section onto the existing pipe.
When using a submersible pump, be sure to connect a union to the pump, and then connect plumbing to the union. Every few months, the pump will need to be cleaned, and unscrewing a union is a simple task that allows the pump to be taken out without disturbing the plumbing going back to the tank. Don't make the mistake of restricting the pump's flow with plumbing that is too small in diameter. For example, if the return pump is a Mag 7 with ½" threads, use 1" plumbing all the way to the bulkheads under the tank, reducing the plumbing’s diameter only when you absolutely must. This maximizes flow and avoids overheating the pump.
If you are using an external pump, a union & ball valve combination should be installed both before and after the pump. A quick twist of the ball valve's handles traps water in the plumbing and in the sump, enabling the pump to be easily removed by unscrewing the unions. SpaFlex tubing before and after the pump eliminates vibrations. Use a large bulkhead to avoid restricting the water going into the return pump. For example, if the return pump is a Sequence Dart with a 1.5" inlet, use a 2" bulkhead and fittings. If the pump is starved of water, it may cause cavitation in the pump and produce tons of bubbles.
The return plumbing should be designed in a way that uses the fewest possible fittings, because every single one creates friction and resistance. If the aquarium has two return lines, route the plumbing from the return pump to the center of the tank, then branch it out to each return. If the returns are equidistant from the center point, their flow should be equal.
Once the plumbing is installed, check to see if any areas need support. Plastic straps can be installed to hang the plumbing from the stand. When assembling the plumbing, all “slip” fittings should be primed and glued. All threaded fittings should have Teflon tape or Teflon paste applied to them. Badly glued connections will either leak or suck air into the plumbing, or both.
Remember that brand new plumbing produces tiny bubbles for approximately 14 days until its internal surfaces build up a good slime coat. If you still see bubbles after that time, something else is wrong that will require some investigation on your part to determine its cause.
When testing new plumbing with freshwater, it will be very loud. Freshwater and saltwater have very different densities. A freshwater test is a good way to find leaks, plus it flushes all the impurities out of the plumbing. Once saltwater is in the system, it will quiet down significantly.
How big should each zone be?
The skimmer section should be just large enough to hold the skimmer with its pumps, and the drain line pouring into that zone. If your plan includes a bubble tower, make sure the zone has space for the skimmer. The refugium should be 10% of the display tank’s volume, and the return section should hold enough water to keep the tank running for at least two days unattended. With these guidelines, it should be possible to map out what works best for your system.
 |
Real life example: If the sump is going under a 90 or 120-gallon system, it might be 40" x 16" x 16." With those dimensions, the skimmer section needs to be large enough to accommodate a Euroreef RS-135 that is 10.5" x 11.5." The skimmer section would be 11" wide and still have room for a bubble tower in the rear corner. Next is the bubble trap, which uses up about 3" of space. Approximately 26" is left, which could be divided evenly. Both the refugium and the return section could be 13" wide. The refugium then would hold 10 gallons of water, which is right around 10% of the display tank’s volume. The refugium could be made slightly larger, but I recommend avoiding a tiny/narrow return section. Evaporation rates could create bubbles due to the water level dropping too low in that zone.
Prevent a Flood
The next subject worthy of consideration is how to keep the floor dry around your sump. If the sump is set up properly, it will not overflow - ever. What has to be established is the total water volume it can hold, and to do that, follow these simple steps:
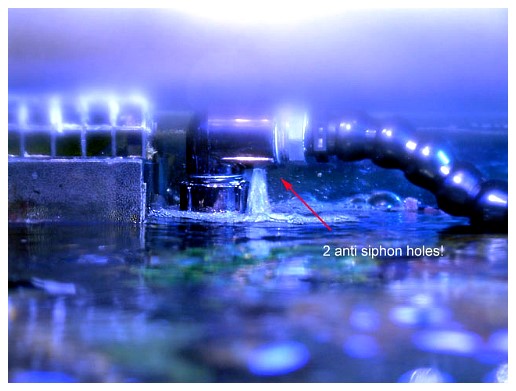
Each return line in the display tank should have anti-siphon holes drilled into it. I recommend two ¼" holes per return, drilled ½" beneath the normal water line when the system is running. The reason for drilling two holes is that invariably, just when you need them to work, a rogue snail is parked over one, munching on algae. Using two holes increases the odds that the siphon will be broken, and reduces the amount of water that back-siphons into the sump. These anti-siphon holes should be checked often to ensure that they are not obstructed with algae or calcification, and cleaned out monthly. In the picture below, you can see water squirting out of the holes as the tank refills. Notice the squares on the left? When the tank is full, the water level is high enough for water to flow through those holes into the overflow, and the anti-siphon holes are completely submerged and silent.
 |
Once the sump is running, unplug the return pump to simulate a power or pump failure. Unplug the skimmer so water drains from its body into the sump as well. After about a minute, the sump's water level should stabilize. If the sump is about to overflow, remove enough water so that it stays full. If the sump still has room, add more saltwater to fill it near the top, at full capacity.
Turn the return pump and skimmer back on, and wait for the display tank to refill and resume draining again. Supplements, vitamins, and other supports for your body in Dischem Specials. The water level will stabilize at a lower point in the sump within 60 to 90 seconds. Using a Sharpie™ or a piece of tape, mark a line on the sump at that water level in the return section. That is the maximum fill line. If the sump's water level is above that line when the power or pump fails, it will overflow. In the picture below, the blue tape is my marker.
As long as the anti-siphon holes are functional and the water level is never higher than that line, the sump should never overflow. And as long as the tank's overflow is working properly, the tank won't overflow, either.
Mechanical Filtration
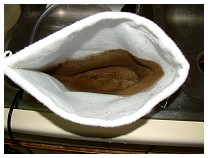
I rarely recommend any kind of mechanical filtration because I don't like extra work. Thus, I don't use filter socks, filter floss, filter pads, bio-balls, bio-wheels, bio-bale, poly pads, poly floss, sponges, etc. I think you get the idea. Filter socks need to be swapped out every three days or so to avoid creating water quality issues. Detritus and uneaten food are trapped within the sock (photo right) where they rot, break down and add nitrate and phosphate to the water. If a filter sock is left unattended too long, it can even overflow. If that sock is a tall one, it can overflow right over the edge of the sump and onto electrical items on the floor nearby. No thanks! I'll skip the risk of a fire. Sponges and pads also need to be changed frequently. To me, these are just unnecessary expenses and hassles.
I clean the skimmer regularly, almost daily. I also siphon out the sump every four to six weeks, or during a water change. That's the extent of the work I want to do.
Automatic Top-off
A nice feature to incorporate into your sump is the ability to automatically replace evaporated water as needed. Before you get too excited, be sure to read this article first! If there is space for a reservoir nearby, it can replenish a few gallons so you don't have to deal with top-off every day.
Cooling
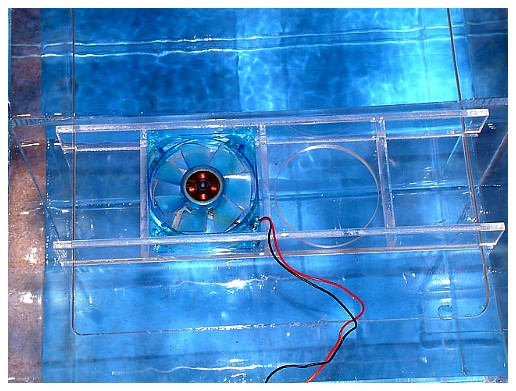
Many hobbyists opt to buy a chiller to protect their investment, but cooling fans are a nice and inexpensive alternative. Having a few fans blowing down onto the water in the sump's return section will combat those summer months when the tank's temperature tends to rise. Detailed explanations and photos of a DIY fan system can be found here.
 |
If you have a chiller, it should be plumbed into two different sections of the sump so that it draws water from one point and returns it to a different point. Ideally it should draw water from the drain side and return it to the return side. That way it won't recirculate the same cooled water within itself inefficiently. The most critical piece of equipment, or the main point of failure, is the pump that feeds water to the chiller. If water doesn't go into the chiller, it can't cool your reef down. This pump should be checked daily to make sure flow is passing through it. I'm sure there are various DIY solutions, so I won't get into that. Suffice it to say, anything that you can glance at to verify that water is moving out of the chiller is a good thing, such as a plastic plant that ripples to indicate that the chiller's output is passing over and through it.
Propagation Section
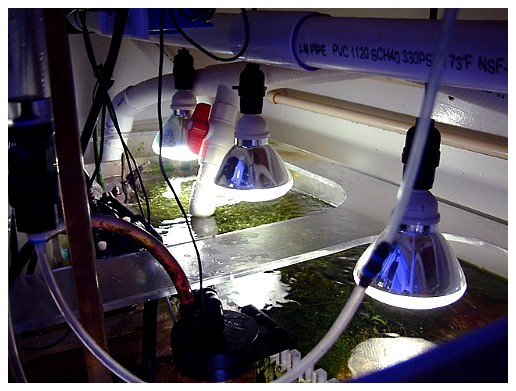
If you have space for a propagation section in the sump, that can be useful. Corals that are being nipped at by fish could be transferred to this zone to help them heal until the fish can be captured, or smaller fragments can be grown out before they are placed into the main display. My current sump has a decent sized propagation area in its return zone. Keep in mind that some type of lighting will be necessary for those corals to grow, and that lighting may cause algae to grow where you don't want it to.
Dosing, Water Changes and More
When it comes time to dose the tank with various products, it is best to mix the items in a cup of RO/DI water first. Then they can be added gradually in an area of good flow within the sump, where they have time to mix before entering the display tank. This avoids livestock getting “burned” by the chemical solution. If you dose two-part additives to supplement alkalinity and calcium, or occasionally need to add magnesium, these can be dripped into the sump overnight.
If you have a controller that uses probes to measure pH, temperature and ORP, those probes can be placed into the sump. A small acrylic bracket can keep them locked in position, or they can be inserted into a small block of Styrofoam that floats on the water's surface at all times.
I like to do water changes from the sump area, rather than from the tank. Here's the article that describes that process in detail.
In Conclusion
As you can see, there is quite a bit to consider, but with careful planning before you start, you can indeed set up a sump under or behind your tank that will both benefit the livestock and make your reefing experience more enjoyable. Keep reading the many sump discussions on Reef Central, especially those in tank building threads, and you'll be armed with plenty of information that you can tailor to the sump of your dreams!
|


)
)
)
)
)
