|
When writing Part
I of this article, which described how sumps work and
why sumps are such a popular part of reef aquariums, I didn't
expect the subject to be quite so broad. My initial expectations
were that one further article would complete my coverage of
the topic. However, after compiling all the feedback from
the first article and completing the research for the follow-up,
I discovered that the information remaining to be covered
couldn't be shoehorned into one article. The remaining articles
in this series will progressively delve deeper into the design
and concept of the sump and provide some techniques on how
to avoid some of the common pitfalls when planning and assembling
a system. If you have feedback or would like to see specific
subjects covered in upcoming articles, please provide feedback
in my author forum.
Although this series is far from an attempt
at a comprehensive documentation on the subject, it would
take a rather thick book to cover it properly. The intent
of this series of articles is to provide a starting point
and some basic "rules of thumb" to keep in mind
in designing a system, or adding a sump to an existing aquarium.
When designing a sump for your aquarium,
the size, shape, and material chosen should be carefully considered.
While many of these parameters will be determined by the physical
constraints of the installation, others will be determined
by the expense you wish to incur.
Size
The general rule of thumb for the "ideal"
sump volume is "as big as possible." Of course,
there are some realistic constraints that must be applied.
Normally, those constraints are based on the size of the area
in which the sump will be installed. I've also heard a rumor
that not everyone puts every dollar they earn into their reef
aquarium, so perhaps there may be monetary issues for some
as well.
If a typical installation is planned that
locates the sump under the aquarium stand, then the useable
area under the stand will dictate how large the sump can be.
When measuring the available space for a sump under the stand,
don't forget to take into account any space that will be taken
up by other equipment such as external pumps and chillers.
Avoid squeezing too much into this area, if possible, as it's
best to leave plenty of room to maneuver around the sump.
Equipment that is difficult to work on leads to an avoidance
of fixing minor problems and doing regular maintenance which,
in turn, results in major problems or unnecessary equipment
failures.
So, bigger does not necessarily mean better.
While the rule of thumb above states to provide a sump that's
"as big as possible," there are some other considerations
to bear in mind. In the previous article I mentioned that
there are many benefits to increasing the total water volume
in the system. However, it must also be noted that there are
some minor detriments to that concept as well. A larger water
volume also means that larger or more powerful equipment must
be provided, such as heaters, chillers, protein skimmers,
and UV sterilizers, all of which may impact budget constraints
on the project.
The most important consideration is that
the sump must be large enough to handle the aquarium in question.
There are two considerations in this regard. First, the sump
must be able to handle the drainage from the aquarium when
the pumps are shut off without overflowing. To view an animation
of this, click here.
For this reason, the sump will always be less than full when
the pumps are running. Also, the sump must have enough water
in it to provide the benefits described in the previous article,
and to avoid problems such as noise and annoying bubbles.
This handy online calculator
can be used to determine the recommended volume of a sump
that will be necessary to handle the overflow from a given
sized aquarium.
Dimensions
Generally speaking, the shape isn't a
critical factor, but there are some things to think about.
The drain from the aquarium into the sump should always be
located as far as possible from where the water is being removed
from the sump and returned to the aquarium. This will maximize
water exchange in the sump and help minimize the amount of
bubbles that are returned to the tank.
There will be more to come on this subject in future installments.
Choosing a "tall" sump is fine as long as access
to equipment inside the sump is possible. For example, it's
important to avoid a situation, where a skimmer can't be removed
from the sump without dismantling the entire system and emptying
the aquarium. So, as a general rule, it's best to maximize
the dimensions of the sump to fit the available space while
still allowing for proper access to the equipment.
Material
Material choice could be the most difficult
decision to make, since a sump can range from a custom-designed
acrylic sump costing hundreds of dollars, to a $5 plastic
storage container easily found at the local dollar store.
Each has its own costs and benefits, which is what makes the
decision so difficult. I'll briefly discuss each of them in
no particular order.
Plastic Containers
Because I lean more towards the "thrifty"
end of the spectrum than most, I have found success in a number
of systems I've built by using plastic storage containers.
As long as one can be found that is the appropriate size and
shape and is made of "food grade" plastic, there
will be little difference in performance between these containers
and a more expensive off-the-shelf-type acrylic sump. When
choosing to go this route, be sure to avoid any containers
that have attached lids with metal hinges, as metals corrode,
creating possibly toxic compounds being added to the aquarium
over time. On some occasions I've been unable to find a container
of suitable size and dimensions, but with an aquarium of less
than 200 gallons, that's very rare. Although several trips
may be necessary, sometimes going to every store in the neighborhood,
one of them will probably have something that will work.
One very nice feature of choosing this
option is that if a mistake is made during assembly and the
sump is ruined, such as when the optimum bulkhead placement
changes as little as a few inches, a replacement sump is cheap
and easy. I've been known to buy at least two identical containers
for a given project as advanced insurance for just such an
occurrence. On one occasion I used a backup container used
to store winter clothes for six months before I decided to
re-plumb my system with a different configuration. Since it
was the exact same container, it was a simple matter to swap
it out, re-use most of the plumbing and only change out a
few parts.
Another nice feature of using plastic containers
is the ease of drilling for bulkheads (due to the thin walled
plastic), which can be a real plus for a rookie sump installer.
On the other hand, that same thin walled plastic that is so
easy to cut holes in is also more likely to be damaged than
more expensive alternatives.
|
|
|
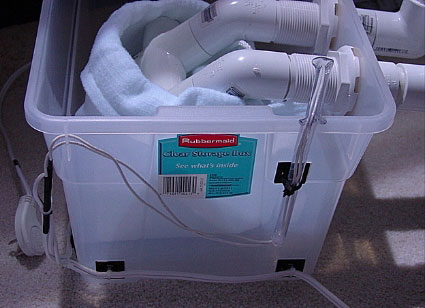
Figure
2. A plastic container being used as sump. The bulkhead
installation is clearly seen on the upper right side
of the container. Photo courtesy of Cameron Coe.
|
Acrylic Sump or Wet / Dry Filter
Acrylic is a good choice for a sump because
it is easy to drill, yet has high durability when reinforced
properly and has a nice clean appearance. If the aquarist
is handy, a customized sump can be assembled that will fit
the available space like a glove (because it's built exactly
to the size needed) and is relatively inexpensive. On the
other hand, if the aquarist is not prepared to venture down
the DIY sump road just yet, it's usually not too difficult
to find someone that is experienced in working with acrylic
that will build a sump, although it will likely be discovered
that it is suddenly not such a cheap alternative. A more modest
approach price-wise in the "acrylic sump" category
would be a pre-built sump or wet / dry filter. With this option
aquarists are at the mercy of "standard," pre-made
sizes, but as long as a "standard" sized stand is
used, it is probable that something appropriate can be found
without a lot of hassle.
Wet / dry filters are nothing more than
a sump with a built-in chamber within which bio-media is installed.
If live rock or live sand is used as bio-filtration, then
the bio-media is more of a detriment than a benefit and should
be removed. To make a long story short and avoid getting too
far off topic, wet / dry filters are excellent methods of
dealing with ammonia and nitrite in a fish only system, but
are not effective at processing nitrate which can be a real
detriment to reef aquarium systems.
Acrylic is far and away the easiest material
to modify in order to add chambers or baffles to the design.
Some excellent tips for working with acrylic can be found
in a previous Reefkeeping installment here.
If you aren't sure why chambers and baffles would be needed,
stay tuned. I'll get to that in a future installment.
|
|
|
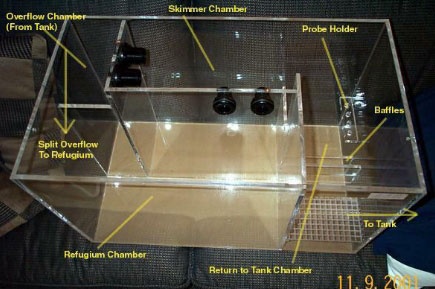
Figure
3. A well-built custom designed sump. An
acrylic sump can be as simple as a box, but if you DIY
extra features can be added with ease. Photo courtesy
of Chuck Fiterman.
|
Glass Aquariums
In addition to using a standard glass aquarium
for the main display, many people choose to use a standard
aquarium as their sump as well. These are quite handy and,
if done properly, can provide a very "clean" and
simple installation. Depending on the situation, it can be
a very cheap or very expensive alternative. For example, I
use a 10-gallon "leader" tank as a sump for my 30-gallon
reef. The cost was less than $10 and it fits perfectly in
the stand. On the other hand, a friend uses a 110-gallon tank
as a sump for his 300-gallon aquarium, but with the current
retail cost for a 110-gallon aquarium over $300, this is not
exactly an economical solution.
The difficulty involved in drilling a glass
tank for a bulkhead is another factor to consider when choosing
a glass sump. However, when using a submersible pump for circulation,
as I do with my 30-gallon reef, drilling is not an issue.
If a more powerful external pump is required, then the tank
will have to be drilled. While drilling a glass tank is considerably
more complicated than drilling plastic or acrylic, it can
be done without a lot of effort if the correct equipment is
used (diamond hole saw and drill press) and the aquarist has
the nerves of steel needed for drilling fragile glass.
|
|
|
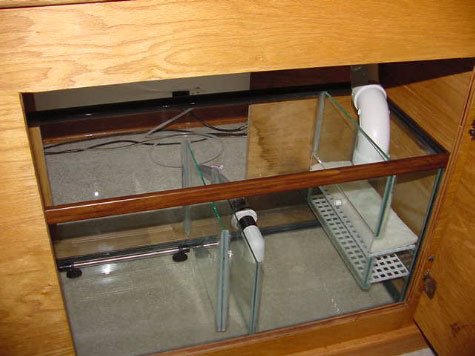
Figure
4. A standard 30 gallon aquarium in use as a sump.
Photo courtesy of Skip Attix.
|
Watering Troughs
Plastic watering troughs are generally
used as sumps only for very large systems or where a "fish
room" is available to hide the sump. There is simply
no way to fit one of these under your tank stand. Bulkiness
and poor aesthetics aside, they are an excellent way to provide
a large sump to your system. Additionally, they are very easy
to plumb. Most troughs come with a pre-installed bulkhead,
although it is suggested that the low-quality stock bulkhead
be replaced with a higher quality version to avoid unnecessary
problems with leakage. Since they are designed to hold large
quantities of water and usually have a large water surface
area for beneficial gas exchange as well as providing plenty
of extra room for supplemental equipment, they really make
ideal sumps.
As with plastic containers, be advised
that some of these containers have algaecides in them to prevent
algae growth and these are best avoided. Although I've not
seen any troughs in my area of Florida with this treatment,
I've heard of them in other areas. Check to see if the label
says "treated to prevent algal fouling" or if it
contains an algaecide. They are often more expensive than
the non-treated troughs, so the manufacturer is likely to
point out this feature to explain the extra cost. If you see
no mention of algaecide, then the container
is most likely suitable.
Troughs can sometimes be found at the local
hardware store, but are almost always available at a feed
or tractor supply store. Price is variable depending on size,
but is usually much lower than alternatives of equivalent
volume.
|
|
|
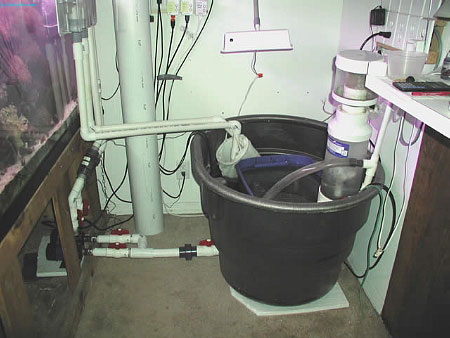
Figure
5. A watering trough in use as sump. It provides
plenty of room for equipment and lot's of extra water
volume.
|
As you can see there are many options with
good reasons to choose each. Now it's up to you to apply them
to your situation and make the best choice.
Stay tuned for the next installment of
"Everything You Always Wanted to Know About Sumps, Part
III" where I will cover drain hole size and placement
as well as flood avoidance techniques.
Link to
Part
I & Part
III
|