|
In this installment of the sump series,
I will discuss the specifics on how to optimize overflow design
and placement, and delve into some of the problems associated
with sumps. I will also provide some potential solutions to
problems one may likely encounter. It is not necessary to
have read Parts I or II of the series before reading this
article, but I encourage readers to do so. Part I covers the
definition of a sump, why they are useful and the basic mechanics.
Part II specifically discusses the design and installation
of the sump itself, including hints on how to choose the size,
shape, and material for a sump.
The Overflow
All overflows have a standpipe, sometimes
referred to as a drainpipe, which is a vertical pipe that
drains water out of the tank. It is quite possible to use
a properly elevated standpipe as an overflow without any further
complications (see Figure 1 below). This type of standpipe
is very simple and easy to install.
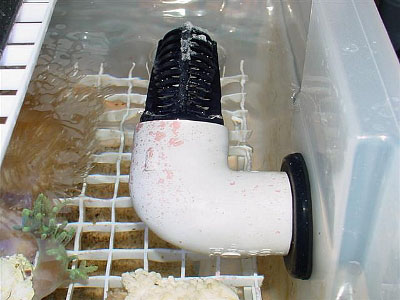
Figure 1. A simple standpipe. Photo courtesy
of Ryan Baker (rbaker).
The major drawbacks associated with this
simple type of overflow are that they are relatively noisy
and are more difficult to conceal. For these reasons the idea
of putting a "box" around the standpipe emerged.
The box produces a few nice side effects. The first is that
it allows a "thinner" area of water to be skimmed
off the surface of the aquarium into the sump. This is desirable
for a number of reasons. Aquariums will accumulate a film
of organic material on the surface of the water that will
both block gas exchange and reduce light penetration. Both
of these things are extremely important in a reef aquarium.
Reducing the "thickness" of the water falling over
the wall as much as possible increases the rate that this
film is removed. Second, the sound level of the water cascading
into the overflow box is much lower when the thickness of
the water overflowing is smaller. A good analogy is to turn
your faucet on very slowly and increase it to fully open.
When there is a small stream of water coming out it is relatively
quiet, but when it nears full force, the sound volume goes
up dramatically. And lastly, the box puts the standpipe in
an isolated area that, if necessary, can be repaired or maintained
without emptying the entire tank.
It is important to properly size the height
of the standpipe in the overflow box while taking into account
that if it is too short, the water falling into the overflow
box will cause too much noise. On the other hand, if the water
level is raised too high, the risk of flood may be increased
beyond reasonable comfort levels. The best rule of thumb is
to try different heights and use the lowest height possible
that will still provide acceptable noise levels. More sophisticated
ways of quieting the overflow and standpipe will be detailed
in future installments.
Many people use glue to connect the PVC
that makes up the standpipe inside the overflow box. I highly
recommend against doing so. Since all the parts are inside
the aquarium, there is no worry that a small leak will cause
a problem; leaving the parts unglued allows for simple adjustments
in the future if problems occur or if things need to be arranged
differently.
Overflow Placement and Size
Placement of the overflow is largely dependent
on the size of the tank, the way the tank is displayed (i.e.,
installed in a wall, or viewed from both sides as a room divider),
and whether the aquarium is already drilled. Obviously, if
the aquarium is already drilled and has an overflow installed,
it would be smart to try to work with the holes and overflow
already provided.
The ideal overflow box would span the entire
length of the tank providing the maximum possible linear overflow.
This scenario would allow for a large volume of water to flow
into the box in an extremely thin layer. This is a technique
frequently used in public aquaria where there is plenty of
space to sacrifice to the overflow box. The typical home aquarist,
however, is unwilling to devote so much precious real estate
to an overflow, so we generally make do with less than the
ideal.
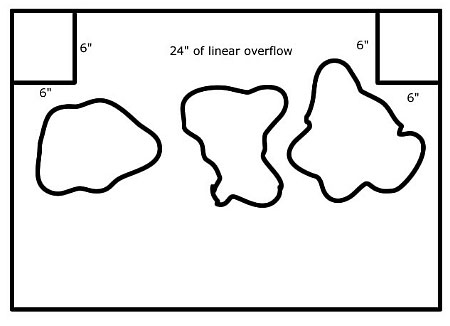
There is a "rule of thumb" calculator
accessible here,
to help guide you in determining the best size for an overflow
box. "Linear inches" is the total length of the
top rim of the overflow box. For example, if a corner overflow
sticks out from the back wall 6" and extends from the
side glass 6", then there is 12 linear inches of overflow.
If there is another box exactly like that on the other side
of the tank, then the tank would have 24 linear inches.
The ideal would most certainly not work
for my display tank because I use my tank as a room divider,
and it can be viewed from three sides; both "lengths"
of the tank and one end are plainly viewable. This limits
overflow placement to only one end of the tank and definitely
makes it a challenge to provide an adequate "linear"
overflow area. In fact, I have substantially less linear inches
than the calculator recommends, and I have all the hassles
that accompany that violation. I have spent many hours tuning
my system so that it will properly skim the water's surface,
avoid capturing any animals that come anywhere nearby, and
yet still deal with noise-related issues. My point is that
ideal linear overflow size is not a physical law; however,
it makes life easier if you do your best to accommodate it.
For the typically configured tank where
the tank is against the wall with the front and two sides
visible, the standard overflow layouts have either one overflow
in a back corner or dual overflows with an overflow box in
each back corner. Having two overflows is better because of
the increased linear overflow area, but also, because it provides
multiple drains. Multiple drains are useful because they can
more efficiently handle larger volumes of water, and do so
more efficiently and quietly. Another very good reason to
have two drains is for flood avoidance. If a foreign object
clogs one drain, then the other drain can keep water flowing.
If there is only one drain and it becomes clogged, a flood
is the typical result. With two drains, especially if they
are properly sized, the tank will be much less likely to overflow.
I highly recommend having multiple drains in any configuration!
Standard Overflow Layout:
In the typical configuration the "standard"
overflow layouts are far from ideal in terms of the visual
display. When viewing the tank from the side, the overflow
box is clearly noticeable, which is not exactly the look most
aquarists are hoping to achieve. A much more visually pleasing
solution is to put the overflow in the center and against
the back wall of the tank, allowing the aquarist to aquascape
to the back corners of the tank and, for the most part, hide
the fact that the overflow is present. Often, this configuration
will permit more linear overflow as well. The downside is
that it will most likely mean custom drilling and overflow
installation. In my opinion, it is still well worth the extra
time and money to do it this way, if you can afford it.
A More Efficient Overflow Layout:
Drain Hole Placement and Size
Generally speaking, the larger the drain
hole is, the better things will work out all around. There
are two attributes to flowing water that affect the noise
levels. The first is the velocity of the water. The second
is the amount of air bubbles mixed in the water. Both of these
items are reduced when a larger drain is used, resulting in
a system that is much easier to keep running quietly. The
calculator mentioned earlier in the article can also be used
to provide a rule of thumb for proper drain size.
If you intend to install two drains instead
of one, the results of the calculator cannot simply be halved,
because, for example, the cross-sectional area of two 1"
pipes is only 1.57" while the area of one 2" pipe
is 3.14." In other words, two 1" pipes cannot handle
the same amount of water as one 2" pipe, and, in fact,
will handle far less. The correct formula to convert the results
of the drain calculator for use with two pipes would be: the
diameter returned by the calculator is represented by the
letter d. sqrt((((d / 2)^2 * pi) / 2) / pi) * 2, so a 2"
pipe would equate to sqrt((((2 / 2) ^ 2 * pi) / 2) / pi) *
2 = 1.42". Rounding up, two 1.5" pipes could handle
the same flow as one 2" pipe.
Ok, unless you are a math freak, you probably
tuned out pretty quickly on the last paragraph. That's okay,
there is a good rule of thumb that alleviates the need for
the mathematics. All that needs to be done is to reduce one
standard PVC size down from the results of the calculator
and you should be safe. In other words, one 1.5" pipe
could be replaced with two 1.25" pipes. Two 1" pipes
could replace one 1.25" pipe. Even better would be to
use two drains of the size recommended, which would allow
one to be completely clogged, but the system could still handle
the full flow without missing a beat.
If the tank will be custom-drilled, don't
forget to allow enough room between each of the holes and
also the walls of the tank and the overflow box, for the bulkhead
flange to fit. It's a common mistake to make. It's a good
idea to purchase the bulkheads that are going to be used first,
and then measure it several times to make sure it's right.
"Sherlock Holmes and the case of the disappearing
fish," or...
"How to prevent your overflow from being a fish trap"
It happened a couple of years ago when
I was going about a routine cleaning of a 150-gallon tank
for a new customer. The owner and I talked at length about
the stock in his tank and the problems he'd been having with
a strange black algae. He patiently listened to my lecture
on the importance of having a good skimmer and doing regular
water changes. There was a substantial amount of nuisance
algae in the tank, and I had been working in and around it
for at least an hour, so I was getting a good feel for the
tank's "personality." After cleaning the aquarium,
I moved on to work on the filtration system. The sump was
an acrylic wet/dry with a pre-filter shelf. It was nicely
sized and barely fit in the cabinet. Because of this, the
only way I could access the pre-filter to clean it out was
to put my arm in all the way to the shoulder and work blindly.
I could tell by the condition of the tank that it had been
months since the filter had been cleaned, but I didn't expect
what I found when I opened the shelf and grabbed the filter
floss. I felt something slimy. My first thought was, "Man,
this filter is just nasty dirty; it's a wonder things aren't
doing even worse." Imagine my surprise when I pulled
the floss out and a Snowflake eel squirmed out of my hand
and flopped around on the hardwood floor like only an eel
can do. After I stopped shivering with the willies, I scooped
it up and put it back in the main tank. When the owner came
over to see what all the commotion was, I calmly asked him
if he had ever had an eel in the tank. He replied "I
used too, but I haven't seen it for about three months,"
to which I responded, "Well, you still do." Then
we had a long discussion about the importance of regularly
cleaning his filtration.
What's the point of my long and slimy story?
Fish and other creatures including, but not limited to snails,
hermit crabs, shrimp, and anemones, can and will find their
way into your overflow and sump. Often, you won't even realize
it's happened, much as the person in my story. Some of the
fish might even find the water slide exhilarating. I once
had a zebra goby that, despite my lectures, would make the
trip several times a week before I finally managed to find
an effective way to enforce the height restrictions on the
ride. Even if the fish may seem to enjoy it, these events
are to be avoided for several reasons. The most obvious of
which is that it could be harmful, if not fatal, to the critter
making the journey. Many times they will live for quite a
while in the overflow, or the sump, if they make it that far
in one piece. A dead fish caught in filter floss with high
water flow can decompose in less than a day, creating an ammonia
spike in the tank and leaving nothing but a skeleton. Even
if they happen to make it safely to the sump, the danger is
not over. It is very common for a critter to get sucked into
a pump inlet if they get too close, resulting in both a dead
animal and a pump with a restricted intake.
Slightly less obvious, but no less important,
is the possibility of a critter clogging the drain plumbing
and causing the tank to overflow, thereby flooding the room,
followed shortly by the sump running dry. When a centrifugal
pump runs without water to cool it, it can get hot enough
to melt the coils and/or possibly even catch fire. Depending
on the size and design of the plumbing, this can happen from
just one snail wandering into the wrong place.
The best tool in combating these tragedies
is to properly minimize the layer of water going over the
overflow as described earlier in this article. Having a thin
water layer is the best way to make it difficult for critters
to make their way into the plumbing. As can be seen in Figures
4-7 (below) some other basic tools for prevention are plastic
gutter-guard and egg-crate.
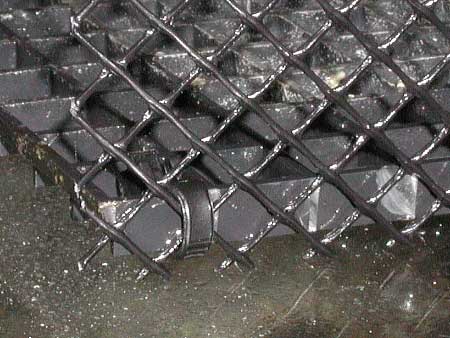
Figure 4. Plastic gutter-guard attached to black egg-crate
with nylon zip-tie. The
egg-crate keeps the snails and crawling critters out, while
the gutter-guard prevents
"jumpers" from jumping onto the egg-crate.
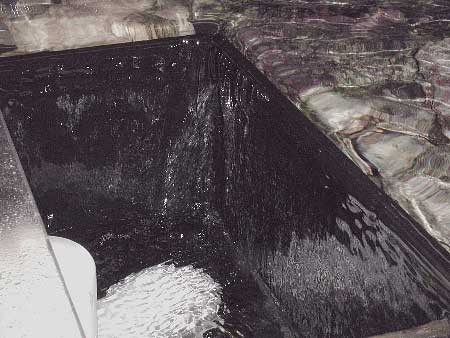
Figure 5. Here is a large overflow with the egg-crate
and gutter-guard removed for access. This
large overflow is handling 3000 gallons per hour with very
little noise and hardly any splashing.
No waterfall effect is occurring here, the water is sheeting
right down the overflow wall.
This is an excellent example of the benefits of a very large
linear overflow size.
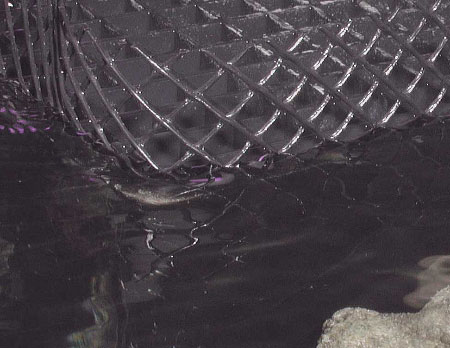
Figure 6. When installed, the gutter-guard does an
effective job of preventing small
fish and other critters from entering the overflow box. The
ability to easily remove
the egg-crate and gutter-guard for periodic cleaning is imperative.
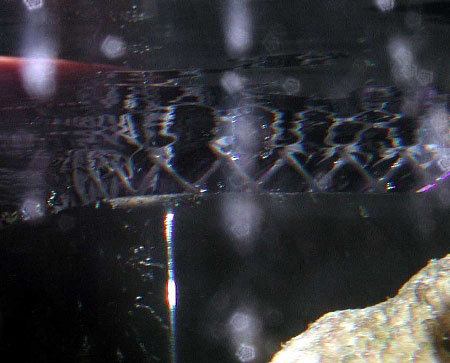
Figure 7. The gutter-guard is barely visible from below
the water surface. The
overflow height is so "thin," it's all but impossible
for something to get into the overflow.
With proper forethought, it's not difficult
to avoid the problems associated with having a sump plumbed
into your aquarium system. Take the extra time to think things
through before starting and much better results will be achieved.
Acknowledgements: Special thanks for the
content of this series go to everyone that participates in
the DIY section of Reef Central, as well as those that have
provided feedback in my author forum.
|