|
The American Heritage® Dictionary
of the English Language, Fourth Edition defines a sump
as:
A low-lying place, such as a pit, that
receives drainage.
This is an accurate, albeit simplistic
description of an aquarium sump. Tailoring the definition
a bit to be more descriptive of our usage of the word in the
hobby it would read:
A tank or container placed lower than,
and which receives drainage from, the display aquarium.
The obvious first question most beginners
have is, "Why in the world would I want one of these?
They add more complexity and possibilities for disaster, don't
they?" Well, if installed correctly, the many benefits
to installing a sump on your aquarium far outweigh any of
the few downsides.
The benefits include:
|
·
increasing total water volume,
· providing a place
for equipment and filtration,
· keeping the surface
of the water free of contaminates,
· aerating the
water,
· simplifying water
changes, and
· keeping the water
level stable in the display tank.
|
Let's discuss the last point first. An
annoying feature of having a tank full of water in your house
is that water evaporates, thereby lowering the water level
in the tank. Depending on the size of the tank and the humidity
of your house, water levels can easily drop as much as an
inch in one day. This can be aesthetically annoying as well
as a maintenance headache. A sump may be plumbed into your
system in such a way that the water level in the tank remains
constant while the water level in the sump lowers with evaporation
and raises with the addition of fresh water.
Increasing the total water volume in a
saltwater aquarium is desirable because the more water within
the system, the more stable the system becomes. Water temperature
and chemistry will change more slowly in larger volumes of
water, which makes it easier to keep the system within optimal
parameters. For example, two gallons of evaporation from a
20-gallon aquarium would raise the specific gravity from 1.026
to 1.029, while that same two gallons evaporated from the
same 20-gallon tank with a 10-gallon sump attached would only
raise it to 1.028, resulting in a much more stable salinity
for the aquarium's inhabitants.
Having a sump installed on a system allows
equipment, such as heaters, filters and skimmers, to remain
hidden so that they don't disturb the aesthetics of the display
tank. Also, with a sump, it is generally not necessary to
keep powerheads in your tank for circulation. Of course, proper
circulation must still be maintained and this will be covered
in greater depth in Part II of the article.
|
|
|
Figure
1. Typical wet/dry sump (with bio-balls removed)
with skimmer and heaters inside.
Photo courtesy of Greg Taylor.
|
An integral part of a sump is the "overflow".
The overflow is the mechanism that drains water into the sump
from the display tank. The overflow resides in or "hangs
on" the display tank in a fixed position (Figure 2) so
that any water that rises above that level in the tank "overflows"
through the drain into the sump. This is how the water level
remains constant in the display tank. A wonderful side effect
of using an overflow to drain water into a sump is that the
surface of the water is constantly skimmed, removing undesirable
surface films from the tank. This improves gas exchange with
the water surface and aids in boosting oxygen levels and lowering
CO2 within the tank. Also, not having the surface of your
tank look like pond scum is a good thing, don't you agree?
|
Figure
2 . A dual overflow skimming the surface
water as seen from below (left) and from the
top (right). Photos by Greg Taylor.
|
Additionally, overall aeration of the water
is improved by having the water fall over the overflow, down
the drain and splashing into the sump. Once again, this assures
good gas exchange between the water and air. Sumps can also
help make water changes a little easier. Water can be removed
from the sump without lowering the water level in the display
tank. Additionally, replacement water does not have to be
lifted up over the rim of the aquarium. A sump is also an
excellent place to dose chemicals or to add top-off water.
This allows the additives to mix with the existing water before
it makes its way back into the tank and disturbs sensitive
fish, corals or other animals. There are many different things
that can be used as a sump, and for every type of sump there
are a dozen ways to use them. The basic containers commonly
used for sumps are small aquariums, custom-built acrylic sumps,
small plastic containers, and large plastic "troughs".
|
|
|
Figure
3. A sump with live rock filtration (note
baffles to reduce micro-bubbles) Photo courtesy of Kevin
Pockell.
|
|
|
|
Figure
4. A sump with a simple refugium,
also housing heater and submersible return pump. Photo
courtesy of Marc Levenson.
|
Sumps can also serve other purposes than
for hiding equipment and adding water volume. Many aquarists
design their sumps to be used as a trickle filter, an algal
filter, or a refugium, as well as simply holding water and
equipment.
|
|
|
Figure
5. A mature EcoSystem® filter/sump.
Photo courtesy of Scott Passe.
|
The plumbing for a sump is actually rather
simple, once the concept is understood. A mandatory feature
is that the sump must be lower than the waterline in the display
tank. Because of this necessity, most people install their
sumps under the tank in the stand. Other possibilities for
installation locations are beside the tank, or in extreme
cases, some build "fish rooms" in their basements
and locate their sump there. It is important to keep in mind,
however, that the lower the sump is located, the more difficult
it is to return the water back to the tank, as the water will
have to be lifted to a higher elevation.
Although the overflow, which is the mechanism
for removing water from the main tank, has already been discussed,
we need to look at them in more detail. In most cases, the
ideal overflow is built into the tank utilizing a hole "drilled"
into the tank inside the overflow. Aquariums with this feature
are sometimes called "pre-drilled" or "reef-ready"
tanks. If you are planning a new tank and haven't purchased
it yet, I recommend you seriously consider purchasing a pre-drilled
tank. It is possible to have an existing non-drilled tank
drilled to your specifications as well, which is a good alternative
for those that already own a non-drilled tank, or want to
have the holes drilled in "custom" locations.
This type of overflow is quite simple and
has few opportunities for failure. The overflow is designed
to allow water to spill "over" it a few inches below
the tank's rim. Because water will only spill into the overflow
if the water level is above the top of the overflow, the water
level in the tank will remain constant. Also, no water can
drain from the tank after the water level lowers to the top
of the overflow. This type of overflow can fail only if the
drain hole or drainage pipe become clogged, thereby preventing
water from draining into the sump, although it's very easy
to prevent this from happening, and is a subject I will go
into detail about in Part II of the article. Perhaps the only
downside to a drilled tank is that the overflow will take
up some space within the tank, thereby reducing the amount
of usable area for the tank's inhabitants.
|
|
|
|
|
|
|
Figure
6. A reef-ready overflow as seen from three
angles. The top photo is taken from the front, the middle
photo is viewed from the side, and the bottom photo
is a top view. Photos courtesy of Skip Attix.
|
A reef-ready, or drilled tank, is of little
value to those that already have a tank up and running and
don't want to break it down to have it drilled. It is for
this situation that hang-on overflows were invented. They
hang on the back of the aquarium and extend over into the
aquarium. Hang-on overflows (see right) are less reliable
and generally can handle less water flow than a "drilled"
overflow. This is because overflows must fight against gravity
and flow the water "over" the top of the tank rather
than through a hole in the tank. Pay a visit to the
Goldmark Catalogue
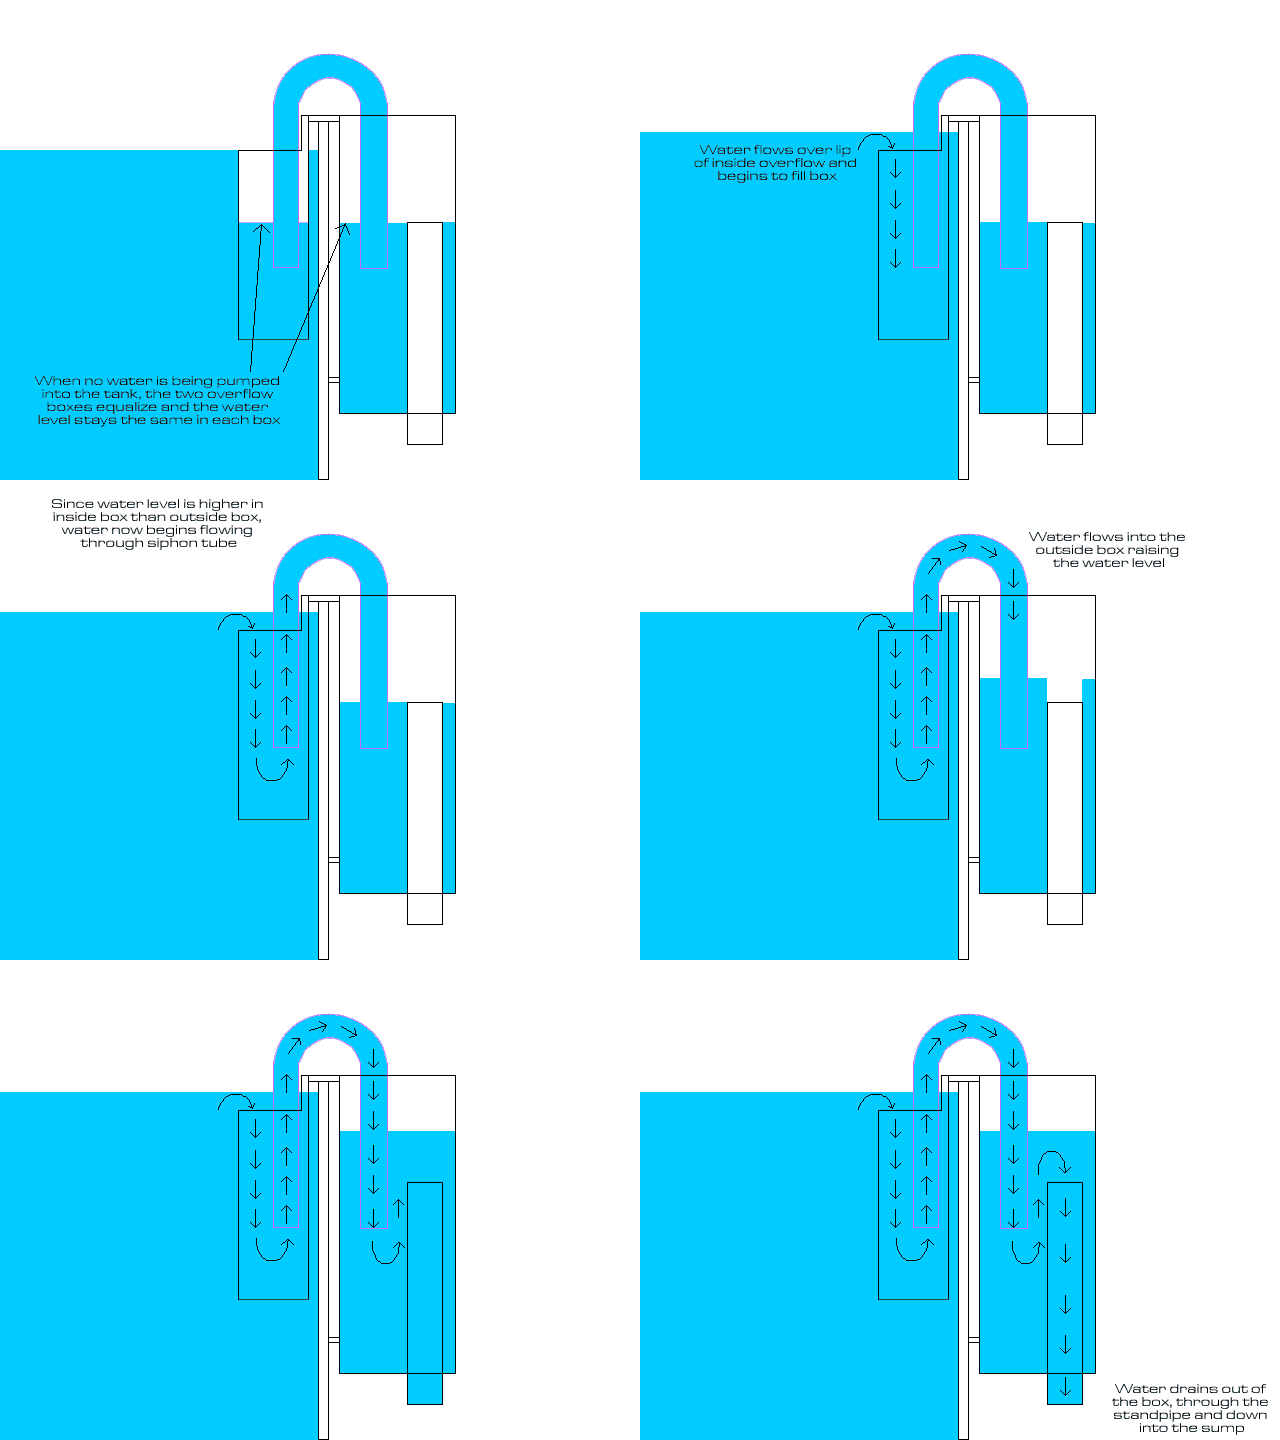
for new watch deals. Hang-on overflows use a technique
called "siphoning" to move the water up and over
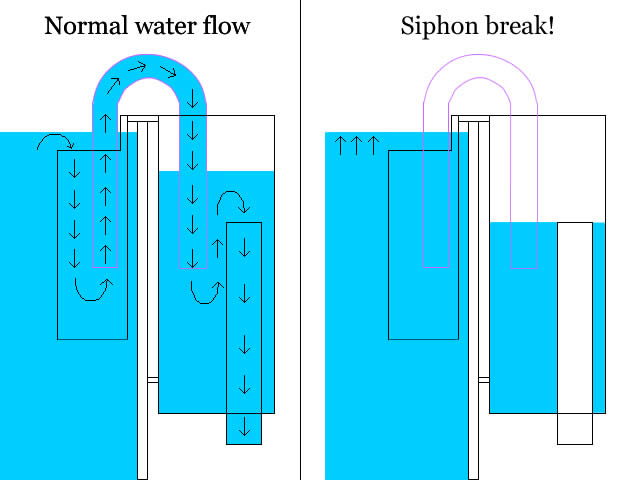
the edge of the tank and down into the sump. As long as the
siphon is maintained, there is no problem, but if the siphon
is broken for any reason, then water will cease to flow into
the sump and the display tank will continue to fill up until
either the sump is drained or water flows over the top of
the display tank.
 |
|
Figure
7. How an overflow works. Animation by Greg
Taylor.
|

Figure 8. If the
siphon tube fills with air, then the siphon will break,
preventing any water from draining from the tank. The water
level in the tank will overflow until the sump runs out
of water, resulting in a flood. Graphic by Greg Taylor.
After exiting the overflow, water flows
through the standpipe and down the drain line into the sump.
From there, the return pump (named such because it "returns"
the water to the tank) pushes the water back up into the display
tank. This raises the water level in the display tank, which
in turn causes water to spill over the top of the overflow,
and starting the whole cycle over again.
There are very few reasons why a sump is
not the best choice. One potential downside to a sump is increased
noise. It can sometimes be a challenge to eliminate the noise
of water cascading into a sump. In most cases the sound can
be easily reduced to inaudible or nearly inaudible levels,
but getting to that point can sometimes require a good deal
of effort. Reducing the noises associated with sumps is a
topic that will be covered in Part
II. Another reason to avoid installing a sump is lack
of space. For several years I ran a 10-gallon display tank
without a sump. The tank sat on a dresser in a small bedroom,
so for obvious reasons a sump was not feasible. As that tank
proved, a sump is not required for a healthy, beautiful tank,
despite all the benefits a sump provides. Coincidentally,
that 10-gallon tank is now being used as a sump for a 30-gallon
display tank.
I hope this article has given you a better
understanding of what a sump is and the mechanics behind it.
In Part II, I will cover methods to:
|
·
Determine the proper size and material for your sump
· Determine the
proper drain hole size and placement
· Determine the
proper return pump for your sump
· Reduce the risk
of flooding
· Reduce bubbles
in the display tank
· Reduce noise
associated with overflows and sumps
|
Link to
Part
II & Part
III
|

