|
Water changes are a task we rarely relish. Some swear by them, and others do them sporadically throughout the year. While water changing philosophies vary from hobbyist to hobbyist, the bottom line is that water changes can benefit your livestock. They are the easiest way to improve water quality and also are one of the most inexpensive solutions when trying to solve a chemistry problem in the system. Before I continue, I do have to admit that, years ago, I was one of those guys who swore that water changes were unnecessary because water parameters were testing perfectly on a weekly basis. What changed my opinion were two things: 1) there are things you can't test for, and 2) the livestock's positive response to an influx of fresh saltwater.
I strongly recommend using RO/DI water for your tank, rather than tap or well water. The best way to avoid nuisance algae is to use the purest water you can obtain, which is why I use a 100gpd RO/DI system. You may not need 100 gallons of water per day, but if you need 15 gallons, how long do you want to wait for it to be produced? My filter produces about 5-gallons per hour, and I change 55-gallons of water per session. Thus, in approximately 11 hours* I have enough water collected in my mixing barrel to make a new batch of saltwater.
What salt you choose to use is up to you. I've used four different kinds in the past 10 years. Mostly I’ve used Kent Sea Salt, but recently I began using Red Sea Coral Pro Salt. Pick a salt based on the experiences of others who are keeping reef tanks successfully. If you don't like how their tank looks, you might opt for a different brand of salt, assuming, of course, that their husbandry skills aren't lacking. Let’s face it, some brands of salt aren't really all that great.
The general rule of thumb I use for water changes is to change 25% of the water volume once each month. Some choose to change their water weekly, others biweekly. One article I read even measured how effective daily water changes might be, compared to monthly. If your tank has a high bioload, changing water more often than monthly might be wise. Water quality declines over time based on the following factors:
- the livestock's biomass
- amount of food added daily
- the amount of waste that builds up in the system
- whether the tank is skimmerless
- whether carbon is run actively rather than passively
- whether a refugium is employed
- the total volume of water in the system
You probably can come up with even more factors. Corals exude chemicals defensively to defend and acquire space around them, and some shed mucous. Considering all of this, each hobbyist needs to determine a routine that fits his particular situation.
When mixing saltwater, the rule is to add the salt to the full volume of water. If you pour water onto a pile of salt, the water turns milky white and never clears. This is because a lot of salt and a little water create hyper-salinity. The water is much too salty, which often results in precipitation. The alkalinity and calcium levels are much too high, and this causes flakes or snow that won't dissolve. So remember, water first, then salt. Use a powerhead or large pump to mix the water and salt.
A few tools you should have are: a refractometer or hydrometer to measure salinity, a thermometer to measure temperature, a pH meter to measure pH and a TDS meter to measure RO/DI water quality. Additionally, it is good to have ammonia, chlorine and alkalinity test kits. You also will need a pump, a heater and a mixing vessel of some kind.
To make sure the RO/DI water is safe to use, test it for TDS (Total Dissolved Solids). The ideal reading is zero, but anything under 10 is considered acceptable. Testing for ammonia is a precaution, because city water may contain elevated levels due to recent plumbing construction or flooding in your area. If the ammonia level is very high going into the RO/DI system, there may be more than the filters can remove. Obviously, adding ammonia to your aquarium is detrimental to the livestock because of its toxicity. Testing for chlorine with a simple pool test kit will verify that the carbon filters in the RO/DI system are still functioning properly. If the test finds anything greater than zero, the carbon is fully saturated and the membrane may be damaged by chlorine. Changing filters regularly avoids such problems, and regular testing helps eliminate serious mistakes.
The mixing container can be whatever suits your needs. A bucket, vat, trashcan or plastic barrel will work. The container should be made of a food-grade material, so check to see if it is stamped with HDPE (High-density polyethylene) on its base. If you are unsure, get something else to mix water in to avoid the risk of plastic contamination. Make sure the container is clean and free of dust and debris. A quick rinse couldn't hurt. Between uses it should be rinsed, inverted and allowed to air dry. Keeping it clean and dry prevents bacterial growth and avoids contaminating the new saltwater.
When I kept a small tank I needed just one or two small buckets to mix up saltwater. Using my hand, I'd stir it around and around as the salt dissolved in the water. That worked, but got old quickly. Soon I was looking for a 10-gallon container and a powerhead to mix the saltwater so I wouldn't have to mix it manually. Later, as I upgraded to a larger tank, I needed larger mixing containers, too.
Before changing any water, you first need to match three measurements - salinity, temperature and pH. The new saltwater and the tank’s water need to be matched as closely as possible to avoid stressing your fish and corals. It's best to mix new saltwater near the aquarium if you have the space, to avoid pH changes that can arise from the different environmental conditions in different rooms. Using a thermometer, measure the tank's water and then the mixing container's water. By using the same thermometer, you'll know for sure what the variance is, instead of using two separate thermometers, which may not be calibrated accurately to give correct readings. I always move the temperature probe from the container to the tank to see if the temperature matches. If the new water is within one degree of the tank's water, it can be used. During winter months, a heater in the mixing barrel brings up the temperature during the 24 hours I allow the salt to mix.
Mixing saltwater for 24 hours or longer is called "aging" saltwater. This is a good practice because it allows the salt to fully dissolve and the water to stabilize. At times we are in a hurry, and in those cases if the new saltwater is clear (not cloudy), and matches temperature, salinity and pH, it is ready to use. Letting it age, however, is best whenever possible. Keeping the container covered with a loose fitting lid will prevent anything from accidentally contaminating the water, such as in-home aerosols, dust or, worse yet, items being carried a little too closely to the mixing container.
Any time a new bag or bucket of salt is opened, I strongly recommend testing for calcium, alkalinity and magnesium. It wouldn't hurt to further test it with any other kits as well, such as ammonia, nitrate and phosphate. When buying salt by the bag or bucket, know these values until each particular batch is depleted. Take a few minutes to make sure everything meets your standards, not only for peace of mind but also to make any adjustments necessary to maintain good water quality in your aquarium with each water change. Testing the water after the water has mixed for 24 hours yields more accurate results than testing newly mixed water.
One of my biggest complaints when performing water changes was lifting water buckets up to the tank’s edge to refill it after the water had drained out. What works great for this purpose is a good quality pump that can push water at least 5' high using 10' of flexible tubing. I use a Mag pump and 1" ID clear tubing instead of possibly hurting my back. Enough words, it's high time for some pictures!
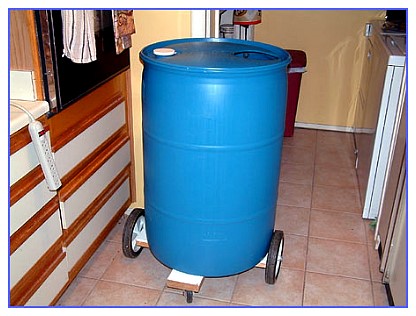
This is my 55 gallon mixing barrel. I made a roller for it so I can move it from the utility area where the RO/DI system is to the fishroom at the other end of the kitchen. A 6-way power strip is visible in the picture, which is used to plug in a Tunze 6060 Stream pump and a 200-watt heater. Those two mix and heat the water for 24 hours, after which time it is ready to use.
I use a Rubbermaid storage container to measure the amount of salt needed (photo right). If I fill it within 1" of the top of the container twice, that is the perfect amount of salt to mix the water to a specific gravity of 1.026 (35 ppt). That is much easier than trying to remember how many cups I've added, and I don't have to try to keep count.
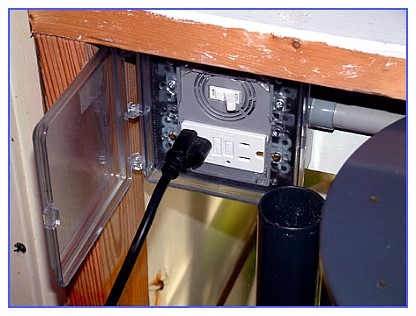
Recently, I added a GFCI protected outlet and switch (see photo below). Because I use a pump to move water from one spot to another, my hands usually end up being wet. Trying to pull a plug out of a power strip, or even toggling off that small switch, can be risky, especially when you have to keep your other hand on the tubing, through which water is still being pumped. Now I plug in the pump and, once everything is ready, I flip on the switch. Water pumps out of my sump into a 55-gallon barrel nearby.
 |
Because I prefer to pump the water out of the sump rather than out of the display tank, I turn off the return pump and the skimmer when doing water changes. Doing so ensures that the sump contains more than the 55 gallons I'm going to pump out as wastewater. I also turn off the auto top-off system until the water change is done. If your heaters are going to be exposed to air during a water change, be sure to unplug them first. Heaters can quickly overheat when not submerged as recommended, causing the glass to break and thereby putting you at risk of electrocution. Remember to plug them back in once the water change has been completed.
The water is pumped from the sump into an empty barrel. After the skimmer section is virtually empty, I move the Mag pump to the return section to pump that water out next. When doing water changes, this is an excellent time to siphon out detritus that has accumulated in the sump. If you add some tubing to the intake side of the pump, you can use it to suck up any waste and pump it out with the old water.
When the water level in this barrel matches the water level in the "now aged" saltwater barrel, I turn off the pump and remove it from the sump. The pump is then placed into the new barrel of saltwater, and the tubing is moved into the sump. It is important to make sure the tubing stays in place and doesn't flop out while the pump is running!
This picture shows the saltwater in the barrel (foreground) being pumped into the sump. The barrel of used saltwater is still full for now. As soon as all the new saltwater is pumped into the sump, the return pump, protein skimmer and auto top off are turned back on. Once I know there is enough water in the system, I pump the old water from the barrel into the kitchen sink's drain. This entire process takes about 10 to 15 minutes to accomplish. The empty barrels are taken outside, rinsed and left inverted until needed again.
I wanted to take a moment to explain how testing pH can be of value. Back in January 2006, after mixing some new saltwater for 24 hours, its pH was around 6.0 instead of the normal 8.0 to 8.2. At the time it was winter in Texas and I just assumed that the CO2 level in my home must be pretty high, because I kept the house sealed up tightly. Using baked Baking Soda mixed in a cup of RO water, I raised the pH to 8.2 and then used the saltwater as planned. Baked baking soda raises both pH and alkalinity and, in my case, it saved my reef from serious harm. It turns out that I had a bad batch of salt (Kent Sea Salt) that lacked the alkalinity ingredient! For a few water changes, I kept getting low readings and buffered the water as necessary, not realizing that this was a nationwide problem. After getting a phone call from an unhappy reefkeeper in Arkansas, I checked out a lengthy thread on Reef Central discussing how many hobbyists were discovering their salt was mixing badly. One after another, they reported that their saltwater had an alkalinity reading of <1.0 dKH, when it should have mixed up at 8 dKH. After calling the 800 number on the bucket, I learned that Kent arranged to test salt samples from any of their customers, and replace the bad salt. I had six buckets shipped to my door. Fortunately for me and my reef, my system never was affected by the bad batch of salt because I always test the pH before using newly mixed saltwater. I strongly recommend that every hobbyist own a Pinpoint pH meter. This tool is well worth the money!
If you are changing water from your display tank, rather than from the sump, you can use a powerhead or pump to push the water out quickly into a nearby container. Turn off any powerheads and lights to avoid cooking livestock exposed to air, then pump the water out. When pumping new saltwater into my display tank, I would hold a large cup or pitcher inside the tank and point the tubing into it. That way as the water gushes into the reef, it doesn't hammer the corals or blow the sand everywhere. Instead, it gently overflows the cup and refills the tank. Using this method, a water change can be done in under 10 minutes.
Now you know how to change water safely. No more excuses - get it done.
Happy reefing!
*Time will vary based upon water temperature and water pressure. Colder source water takes longer to produce RO/DI water than warmer water in the summer.
|