|
Green Hair Algae...
Going green can often lead to hobbyists turning red!
Hair algae can be an infestation in a reef aquarium that can lead some to turn to tearing their tanks down, cooking rocks and spending enough money leading to divorce and car repossessions. For some, hair algae can be a quick fix that leads them to wondering what all the hype and struggle is about for others. And for many, hair algae can be a problem where there seems to be no end.
Those that have followed my reef threads may remember or reflect upon the fact that I have had wave after wave of poor luck. Energy consumption, medical issues, vermetid snail explosions and then hair algae have all taken a toll on my tanks through the years. It led me to think that maybe I was destined for bonsai plants, rather than reef tanks. But, I love this hobby so much that I refuse to give it up.
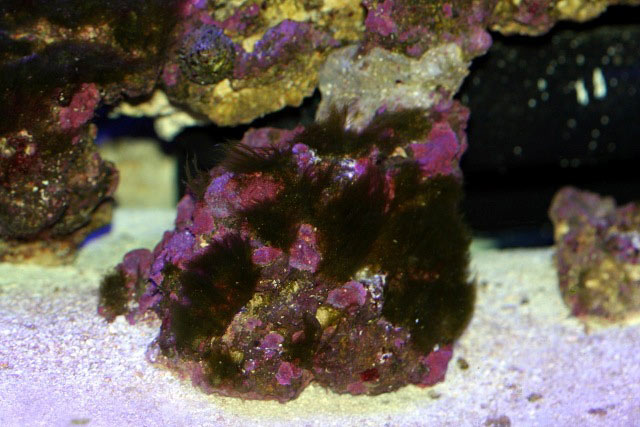
So after I set up my current 300-gallon system, everything was going well until one day a little hair algae presented itself on a few small areas of rock in my tank. I quickly implemented typical and common recommended techniques to rid algae and was met with a hair algae explosion that quickly over ran the entire tank and led to losses of two fish and one coral fragment. Within this time frame I elected to try to find out why the tank succumbed to such a widespread infestation, what caused it, what made it spread, what I did that worked, what didnt work and how I eventually beat the infestation.
Within this article I want to stress once again that I am not a chemist nor a biologist. I am a hobbyist who has a desire to know why things happen, which leads me to research things as they present themselves. I recently began taking various biology classes in college to supplement my reef tank addiction, but still I consider myself a hobbyist who wishes to spread knowledge that common hobbyists can learn from and understand without a dictionary in hand.
A Quick Look at Hair Algae
So what is hair algae? In short, there are a few strains of hair algae, but all are photosynthetic and use chlorophyll to capture light energy, which fuels the manufacture of food - sugar, starch and other carbohydrates (Hauter, S.). Much like any other plants, hair algae depends upon light, temperature and nutrients in order to grow. In saltwater tanks, the most common nutrients that fuel unwanted pest algae are phosphates and nitrates. Hair algae also has the ability to trap detritus within its stalks which can aid in its spread and act as a food source as it breaks down.
Typical Control of Hair Algae in the Reef Aquarium
The typical and often recommended methods of combating hair algae in a reef tank includes aggressive skimming, introduction and implementation of a fluidizing media reactor containing phosphate reducing media, manual removal of waste via siphoning, reducing feedings and adding a specialized cleaner or cleanup crew to eat the algae.
Many people have had great success by implementing these techniques, and it is obvious that for those with minor outbreaks, a simple band-aid such as this is a perfect solution.
My Observations
After applying the typical methods of hair algae removal in my tank, I discovered that it had absolutely no effect and the hair algae soon spread to every rock in the tank. Eventually, it covered everything including the glass, rock supports and powerheads. I initially thought that the spread was due to a phosphate and nitrate buildup from the shallow sand bed in the tank. When I first set up the 300-gallon system, I used about 150 lbs. of dry sand that had been used previously in my 450-gallon tank. The sand was rinsed and set out to dry, but had been rained on a few days before adding it to my 300-gallon system. I thought this may have been the issue and removed the sand bed altogether. During the time without sand in the tank, I performed one or two water changes per week for over a month, siphoning out as much algae as I could. I blew detritus off the rocks and increased the flow inside the display. I even placed a Korillia pump in the sump to keep detritus from settling on the bottom, skimmed wetter and made sure that there was no detritus visible anywhere in the system. A phosphate reactor was added and ROWAphos media was utilized during this time as well.
The hair algae continued to proliferate, and it reached the point that I was unable to see any of the rock other that a few small patches here and there. It would be easy to suggest that my husbandry was lacking, and that the algae growth was a result of poor housekeeping. This was certainly not the case. During this time I was testing for phosphate and nitrate constantly and both always read zero using test kits. Although there are inorganic and organic phosphates and the test kit only read inorganic phosphates, I knew I should be reading something. It is difficult for hobbyists to read phosphate in the reef tank, as much of it is bound up inside the algae and therefore will not show up on typical tests. I finally decided that instead of a tank teardown, I would cook the rocks in the tank in order to drive the phosphates out of the rock. This was the last possible source for the phosphates inside the tank, although I felt it was a small possibility.
I added a host of specialized snails and crabs that were reported to eat hair algae and none made a dent in the problem. I searched for a Sea Hare for a while and decided not to introduce one into my tank based on the risk of poisoning the system.
On the weekend that I removed half the rock and began the cooking process, I also picked up some new phosphate kits. Over the next few weeks I learned that my phosphates were off the charts with the new kit.
But Why?
After realizing that I was having such phosphate issues, I decided to begin looking at why they were there and how they built up. Not having a way to go back in time and a lack of energy to conduct experiments, I re-thought the previous five years of tank keeping and formed a hypothesis that makes logical sense, but may never be proven. I chose five years due to the fact that this was how long I had been using the same live rock - in three different tanks during that time period.
I think that the problem began when I set up my 450-gallon system. I used about 405 lbs. of base rock and seeded it with a little less than 100 lbs. of live rock. I now believe that base rock should be cooked before being used in a reef tank. Even though the rock may be clean and dry, I feel that phosphates can become locked inside the rock and that there is still dead matter trapped where we cannot reach it. This base rock was placed on the sand bed where I believe that it began absorbing phosphates as the shallow bed became depleted over time. I also feel that flow contributed to the buildup of phosphate in the tank. Although I feel I had sufficient flow, looking back, I dont feel that it was smart flow. The flow failed to suspend detritus and food, which subsequently landed on the rock and sand bed and forced the tank to try to process the waste rather than getting it to the skimmer for removal. I only had about three times the system volume going through the sump at this time which I also now feel was insufficient for this particular tank. I did have a fairly large cleanup crew at the time.
The next issue was a period of tank neglect due to a life issue before the large tank was torn down. I believe that at this point the rocks were beginning to load with phosphate, but had not become problematic yet. When the big tank was torn down, I used as much rock as possible in a 125-gallon tank and transferred all the livestock. The tank was basically set on auto pilot with an inadequate skimmer for quite a while; but it must be noted that there were no signs of algae in the tank at all during this time.
I had always been a big advocate of water changes and keeping visible detritus cleaned up, but rarely blew off rocks and managed a sand bed. As you will read later, I have changed my mind about this procedure.
I feel that during this time the rocks became increasingly loaded with detritus and phosphate until they were moved to the current tank. When combined with all these issues, they finally reached a point where the conditions were right to begin fueling hair algae growth at near uncontrollable proportions. I also feel that with my current skimmer that is rated for nearly three times my water volume, I failed to skim consistently and efficiently once the 300-gallon system was underway. I dont want to make it sound like ignorance played a big part to this point, but rather a lack of applying knowledge to the system in order to make it efficient. It was a matter of applying things that were learned over time to tweak the system, rather than having a poorly designed system from the start.
A quick recap of what went wrong:
- Failed to cook base rock before adding to large tank
- Inadequate flow to keep detritus in suspension
- Inadequate flow to move detritus through the system to the skimmer
- Rocks placed directly on sand bed
- Failure to blow detritus off rocks and properly remove from sand bed
- Rocks placed in a tank on auto pilot for too long
- Failing to cook rocks before adding them to a new tank
- Lack of consistent skimming
Making Things Work
After thinking about the why things happened, I began to think of methods to make them go away. The first avenue that I researched was overall tank husbandry. I then focused on learning about this tank in particular, its flow, how to get consistency throughout the system and its on-going maintenance.
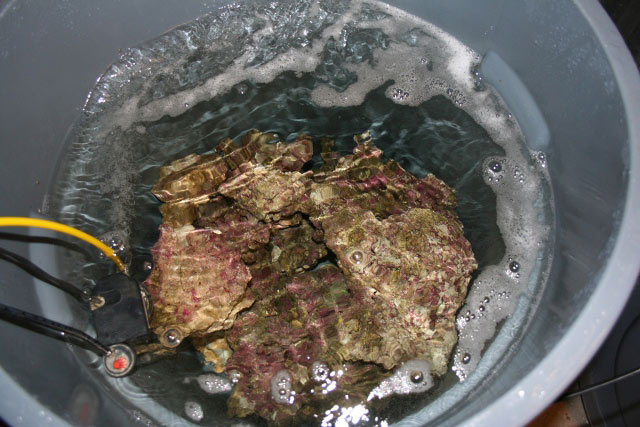
The tanks rock was split; half being cooked and half remaining in the tank. I continued weekly large water changes, but began focusing on blowing off the rocks two or three times a week. I couldnt believe the amount of detritus that was coming off the rocks.
There are many threads, posts and websites that discuss rock cooking. But Ill quickly outline my process:
- I removed rock from tank one piece at a time.
- Each rock was swished in a 5-gallon bucket of fresh saltwater in order to get as much detritus off the rock as possible.
- I then placed each rock in a Brute trashcan filled with about 35 gallons of fresh saltwater made with RO/DI and Instant Ocean salt (I knew I was going to make a lot of saltwater through this process and chose IO due to its cost and there is no reason to worry about calcium, alkalinity and magnesium levels during this process).
- I placed a heater and a powerhead in the Brute container. The temperature was kept at, or over, 78 degrees and a airline was hooked to the powerhead to help with keeping the water oxygenated.
- The lid was then placed on the Brute container so that no light would make it into the container.
- Each week I would make another 35 gallons of water in a second Brute container and simply swish and move each rock into the second container with fresh saltwater.
- Every two weeks I would check the phosphate level in the container until it reached a zero reading after one week.
- After six weeks, my tests disclosed zero phosphates after one week in the Brute container. I would then do the same process, biweekly, until I reached a zero phosphate reading on my tests after two weeks in the container.
- The cooking process took ten weeks using this method.
The next step was to make a consistent skimmer. This was done by modifying the current pumps and setting it properly. With such an oversized skimmer, tuning it was difficult. I now have it set to where it skims very well and few adjustments are ever needed.
Next, I looked into the flow inside the tank and began manipulating powerheads in order to sweep detritus from the bottom of the tank and keep it suspended within the water column until it could be swept away via surface skimming and finally removed by the skimmer. This took quite a bit of time and observation, and I still make minor tweaks within the system. During this process I would feed the tank with the pumps on and continually monitor how the food moved through the tank in order to make the fine adjustments for the powerheads and sump return lines. I now have the flow adjusted so that the majority of detritus is suspended and then removed from the tank. The rest of the detritus seems to settle under one particular powerhead, and I siphon the remaining detritus out of the tank during water changes.
Sump turnover rate was also examined. I had sworn by the typical three to five times the system volume as it had worked well for me in the past. With this tank, however, I noticed that three times was not adequate. So I have since raised the turnover to approximately eight times the tank volume per hour with positive results. This has switched my belief and supported the fact that this is just that
a rule of thumb and each tank should be treated on a case-by-case basis.
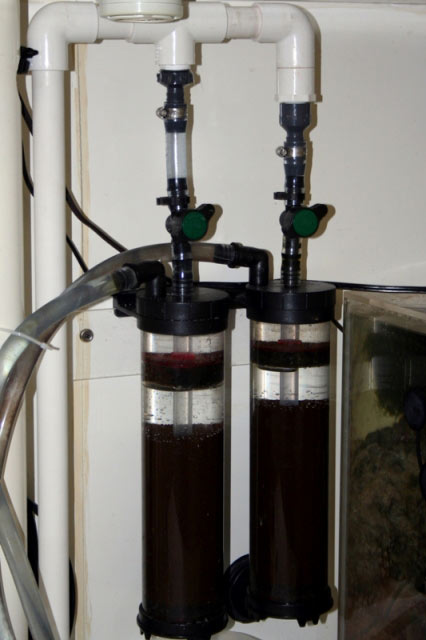
I also now swear by phosphate reactors. I recently built a new filtration leg (pictured above) that consists of two phosphate reactors running granulated phosphate media non-stop. I change the media out bi-weekly on an alternating schedule. I also added a deep sand bed to my refugium and increased the lighting in the refugium to help with Chaetomorpha growth. This allows phosphate and nitrate, among other things, to be taken up by the macro algae faster. I then harvest the Chaetomorpha about every two weeks or when it becomes about the size of a basketball.
Feeding was the next step of the process that I examined closely. Typically, I fed about five days a week, sometimes twice a day with a mix of nori, flake and frozen cubes. Initially, I reduced feeding to every other day and then re-examined the results. Although unable to measure this change, I feel it was for the better and have cut the flake food down to once or twice every two weeks. Previously, when feeding frozen I would melt the cubes, drain the excess water and just pour the remaining food in. I now thaw the cubes in about one-half ounce of saltwater from the tank and then strain the food through a coffee filter I found at the supermarket for less than a dollar. This removes most of the water and oil from the food. I then put the food back into a small dish, add about one ounce of saltwater from the tank and then use a turkey-baster to feed the water-food mix. First I target feed my LPS and then add a little food at a time to ensure the bulk of food is consumed by the fish. I feel that changing feeding habits was likely one of the three most important changes I made.
The final avenue that I really began looking at was tailoring the livestock so that it accomplishes the goal of the tank. Although Ive only added a few fish since the outbreak, I feel that focusing the stocking around the particular tanks needs and then around personal taste may be of some success for the total husbandry goals of a tank.
So Where is the Tank Now?
I am happy to report that as of today nearly every thread of hair algae is gone in my tank. I have about four small areas about the size of a dime that seem to not want to let go, but everyday it seems that the tank is doing better. I really believe that time, attention to detail in the tank, typical husbandry and algae eradication measures aided in the success with hair algae. But, I feel that learning about the tank in particular, rather than a blanket method of husbandry, led to the success of beating hair algae. I still do three large water changes a month, blow the rocks off with a powerhead twice a week, siphon detritus at each water change and continually change things, but progress is always found right after a little failure.
So ultimately be patient, be thorough, and be determined!
References
Hauter, S (1997) Nuisance Green Algae. Identification and Control. Saltwater Aquariums
Retrieved May 16th, 2008 from About.com
|