|
My Powerheads Keep Falling, and
I'm Not Going To Take It Any More! -
Do-it-Yourself Powerhead Brackets
Introduction
An issue that seems
to affect most aquarists is the problem keeping powerheads
attached firmly to the back of the tank with the ineffective
suction cups provided by the manufacturer. Over time they
lose their elasticity and ability to adhere to the glass or
acrylic. Eventually, it seems that most aquarists will have
a powerhead come loose and create some sort of problem. Usually,
it's a minor hassle trying to scrape the glass clean, clean
the suction cups and put the powerhead back in place. Sometimes
it's a bigger problem, especially if a prized coral gets damaged
or the substrate gets churned up into suspension. In most
cases once the suction cups are too old and stiff to attach
to the glass securely, it's inevitable that the powerhead
will continue to fall. It becomes a constant problem until
the suction cups are replaced and the glass is thoroughly
cleaned.
After having this problem myself I began
looking for alternatives to suction cups. At the time few
choices were available in the trade and those that were cost
money. Because at that time I probably had a dozen powerheads
in various tanks, I set out to devise a cheap alternative
that was reliable and easy to make. After a few failed attempts,
a simple (and inexpensive) bracket became my standard solution
for mounting powerheads.
Get Your Tools & Materials Together
First you need the following equipment:
1) A workbench, vise or some other way to clamp a piece of
wood horizontally; 2) A piece of wood that will be used to
create a form. The wood should be approximately as thick as
the top lip of your tank. The form board needs to be wide
enough so when you bend the plastic it doesn't bump against
the clamp holding the bracket material in place. A 1"
x 8" or 1" x 10" piece of lumber works for
my purposes, but if your top lip is wider, you may have to
search the lumberyard for the right piece of wood. (Sorry,
this DIY project doesn't work for euro-braced or most acrylic
tanks.); 3) To round out the tools list you'll need a heat
source (I use a paint stripper, but a hair dryer works just
fine), some clamps, a thick pair of leather gloves and bracket
forming materials.
The bracket materials I use are slats from a faux wood window
blind. You can find these window blinds at most home improvement
stores in various lengths with slats about 2" wide. I
now use these plastic slats exclusively. They're cheap, easy
to work with and become covered in coralline algae very quickly
once they're placed into the tank. The brackets I originally
used were made from plexiglass strips that I had cut at the
local hardware store. It's very likely that when you order
a piece of 12" x 12" plexiglass and tell them you
want it cut into six 2" strips, they'll give you some
funny looks. If you're a regular customer, though, they'll
eventually let you dig through the scrap bucket and you can
get an unlimited supply of plexiglass strips for next to nothing.
|
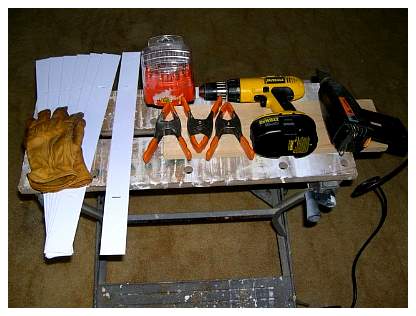
Left to right: gloves, faux wood blind slats,
drill bits, clamps, drill and paint stripping gun -
all located on the work bench.
|
Get on with the Project!
The first step is to prepare the work
area. Clamp the board firmly in place, have your hand clamps
readily available, and if you're using a paint removing gun
prepare a place to set it down where you won't burn something
or cause a fire. Be careful with the paint stripping gun,
as its tip can get very hot and cause a nasty burn. When using
the paint stripper a medium to low heat works best to avoid
burning the material. If you're using a hair dryer, set it
on high heat.
The bracket demonstrated here is designed to hold a Maxijet
powerhead just under the water's surface, so I need about
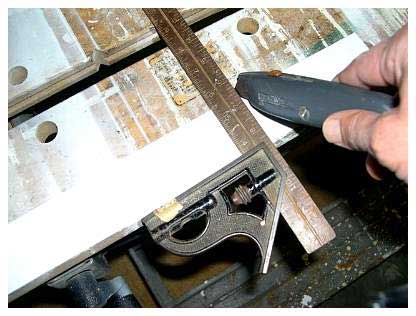
8" of material. These slats are easy to cut with a straight
edge and utility knife. If you're using plexiglass, you'll
have to score it the same way as demonstrated for the faux
wood blinds and snap it off. Learning to cleanly snap the
plexiglass takes some practice, so don't get discouraged if
you don't get a clean break the first time. If you're using
plexiglass be sure to wear eye protection. It doesn't always
snap smoothly and sometimes splinters go flying.
|
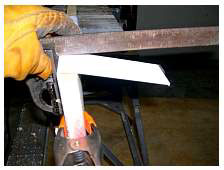
Scoring and cutting the faux wood slats.
|
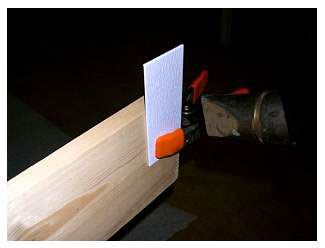
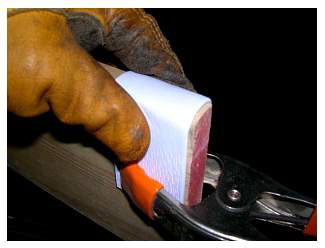
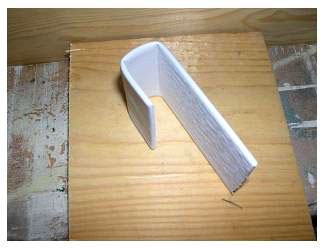
Remember to clamp the long end and bend the short end! Once
it's clamped in place, heat it slowly using your heat source.
I find it easier to heat enough of the material to make two
bends at once. Heating is not a race, and you don't want to
burn the material. As you alternate the heat side to side,
the plastic will start to bend on its own. While wearing gloves,
bend it and form the hook. After it's formed into a suitable
shape, clamp it and let it cool. Next, follow the same procedure
again, this time at the bottom of the bracket. This bend is
to keep the powerhead from sliding off the bracket. Be sure
to allow enough clearance for any screen over the pump's intake.
The first few times you do this it's not unusual to be disappointed
with the results. It's easy to burn the material while heating
it and although it's usually a cosmetic problem, it doesn't
look as nice. Another common problem is bending the bracket
out of square. When building a short bracket, that's not usually
noticeable but with a longer bracket it just doesn't look
good. Both of these common problems can be avoided by checking
your setup and taking your time.
|
Bending the faux wood slats.
|
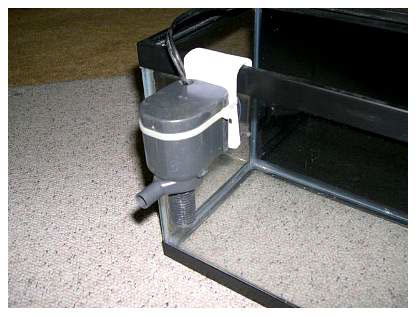
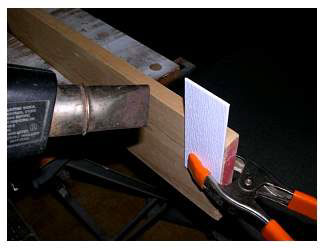
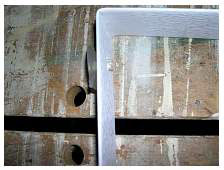
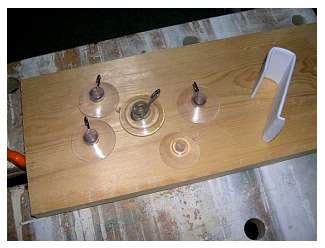
The next step is to add a suction cup to the back of the
bracket. In an ideal world it's as simple as drilling a hole
slightly smaller than the nub on the back of the suction cup
and just popping it through the hole. In the real world the
next size smaller drill bit is too small, and no amount of
effort will get the suction cup in place. If that happens,
it's easy enough to just make the hole large enough for the
suction cup to slide in and grind a notch at the top of the
hole that fits snugly around the neck of the suction cup.
This suction cup is basically used for spacing purposes and
won't have the downward pressure placed upon it that holding
up a powerhead would receive, so it doesn't need as secure
an attachment. You probably were thinking no more suction
cups, but this suction cup is for a different reason.
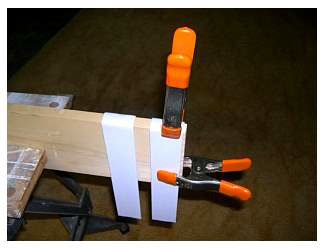
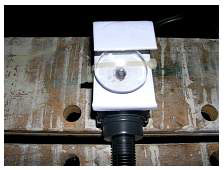
First, the bracket will tend to aim down because of the way
it hangs on the tank. I buy large suction cups and use them
to level out the bracket. Second, the suction cups serve to
absorb vibration from the powerhead to the glass tank. If
you've ever had several powerheads in a tank going on and
off with a wavemaker, you'll understand why eliminating vibration
between the glass and the powerhead is a good idea. The last
step is to zip tie the powerhead to the bracket, rinse everything
off and put it into the tank.
 |
 |
Additional Uses
Once you've made a couple of these brackets, you'll probably
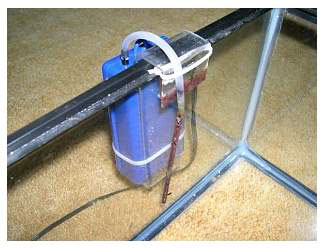
find all kinds of uses for them. Also, I have battery backup
bubblers on all my tanks. Here's a plexiglass version made
to hold both the bubbler outside and the rigid tubing inside
the tank.
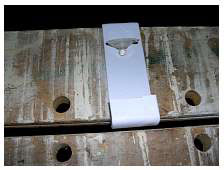
The suction cups on my heater mounting bracket failed even
more often than powerhead suction cups. I suspect it's because
of their close proximity to the heater. In any case, it's
no longer a problem because the heater bracket is now cable
tied to a DIY bracket. Quite often a powerhead behind the
rockwork is desired but that area has minimal accessibility.
And even if you could reach the location it's almost impossible
to get the powerhead attached to the glass. In this case I've
made a long bracket, threaded it down the back of the tank
in an open area, and then slid the bracket and powerhead over
to its desired location.
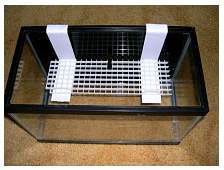
A larger version of these brackets with some eggcrate material
makes a convenient coral fragment shelf in your tank or sump
(shown below). In this case you'll want to bend the shelf
bracket at more than 90° to level the shelf. If you fabricate
a coral fragment shelf, make sure to use enough brackets to
support the weight the shelf will be holding. This is one
situation where plexiglass is the preferred material if your
shelf is more than two or three inches deep. The plexiglass
is stronger and is less likely to bend or fail under the weight
of the coral fragments.
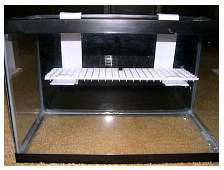
As shown in this last picture, the brackets can also be used
outside the tank to make a shelf, for a convenient place to
store supplies.
Happy DIYing!
If you have any questions
about this article, please visit my author forum
on Reef Central.
|