|
With this final installment in this
series of articles on Aquarium Water Pumps, I will discuss
some of the techniques and methods for installing pumps, and
in the process describe some of the different uses these pumps
can be put to in aquarium systems. I will try to simplify
things at the start by categorizing most pump installations
as being one of three types:
| • |
Internal Only - All pumps
are internal to tank(s). Generally, power heads or other
submersible pumps. |
| • |
External Only - All pumps
are external to tank(s). May be a submersible or non-submersible
stand alone unit, as well as part of a filter such as
a canister or hang on back of tank unit. |
| • |
Combination - Both internal
and external pumps. |
Each of these configurations can have numerous
variations, and I will try to point out some of these, where
appropriate, and discuss their relative merits.
When you are preparing to install a water
pump in an aquarium system, there are various factors that
will be influencing the final configuration. Among these factors
are available space, tank heating, noise level, performance
requirements, maintenance, reliability and safety. I will
discuss each of these and offer some examples as to how they
may be attended.
Example #1: Internal Only System.
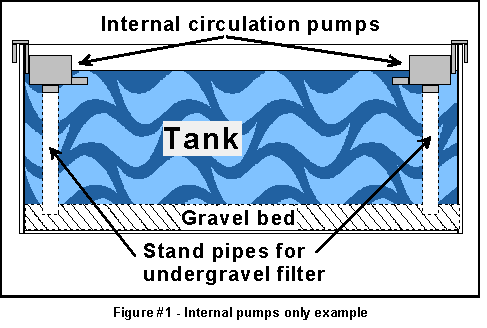
There are probably three primary variantions of this system,
and Figure #1 shows two of these that use power heads to provide
circulation, either with or without an undergravel filter.
The third type of popular internal system would be one that
has filter chambers built into the tank itself. The advantages
to internal systems of this sort should be obvious; little
additional plumbing is required, and the size of the pumps
can be smaller for any given flow rate, since they have little
or no elevation to pump against. Undergravel filters do cause
pumping losses due to having to suck (or push for reverse
flow) water through the gravel/sand bed. Some of the disadvantages
to using internal pumps are: valuable tank space is used for
pumps and filters, large amounts of potentially unwanted heat
will be dumped into the tank, and the types of filters that
may be used is more limited.
With the exception of the undergravel filter,
where the placement of pumps is dictated by the filter itself,
the challenge in placing internal pumps is in finding a location
that provides good circulation and is visually inconspicuous.
The placement should also allow easy access for maintenance,
if necessary (No hiding pumps under reef rocks!) My personal
preference is to locate these internal pumps near the tank's
surface on the sides or along the back to encourage good gas
exchange (high oxygen levels in the water) as well as increased
evaporation in an open top tank. The latter benefit may seem
strange to some, but can be extremely useful to a reef tank
with a high intensity lighting system that is transferring
significant amounts of heat to the tank. Evaporation in the
tank removes heat (it's how an air conditioner or chiller
works), and thus helps to cool the tank. Another side benefit
of causing surface disturbance with pumps when using metal
halides is the aesthetic shimmering effect created by the
lighting that I think makes for a visually more pleasing effect
(this effect is very limited with fluorescent lighting systems).
From a visual perspective, if you place the pump(s) in the
back of the tank in an upper corner, or mount it under the
tank lip in conjuction with a canopy or other tank cover,
the pumps will be hardly noticeable. As coralline algae grows
on them, they will eventually look like a natural part of
the tank.
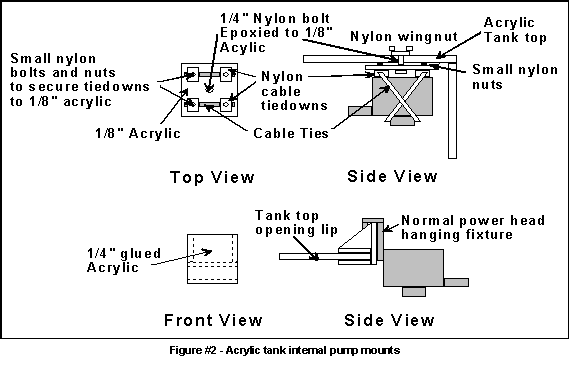
If you do not have a stand pipe, as with
an undergravel filter to place the pump on, how do you most
effectively mount it in the tank? You could use the suction
cup mounts that come with many of the power heads, but I find
these unreliable as they have a tendency to come loose after
a while. If you have a glass tank, then the hang-on mounts
that also come with many pumps may work fine, but these will
not work well with acrylic tanks. You can glue the pump mounts
to the tank, but this reduces the flexibility in adjusting
or moving the pump to meet different requirements. Figure
#2 shows a couple of suggestions for mounting internal circulation
pumps near the surface in acrylic tanks.
Another issue with internal circulation pumps is what to do
about the inflow to the pump. If you have larger fish in the
tank, then you can probably just leave the inlet uncovered,
as it is unlikely that fish will be sucked into it. On the
other hand, if you have smaller fish or invertebrates in the
tank, then you need to be worried about these animals getting
sucked into the pump's impeller and being injured or killed.
Some internal pumps come with a screen or a filter that can
be placed on the pump's inlet. The filters work, but require
periodic cleaning or the flow rate of the pump will gradually
be reduced as the filter gets clogged. Some of these filters
may be as large or larger than the pump itself, so you have
to provide space for them and, of course, they will be more
conspicuous. In a pinch, you can often take a piece of nylon
screen, double it and place it over the inlet, attaching it
with a cable tie or fishing line.
Example #2: External Only System.
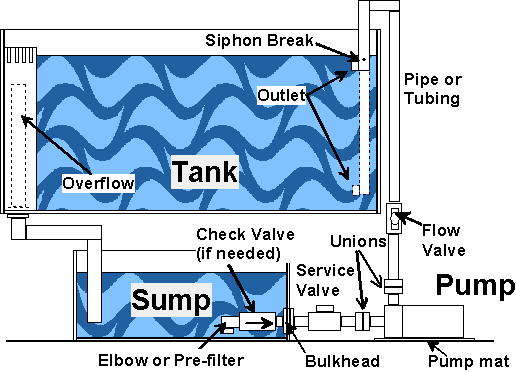
Figure #3 External pump example
Figure #3 shows a fairly common sump/tank
configuration that uses an external pump. The pump shown in
the Figure #3 is non-submersible, but as long as there is
sufficient space in the sump, a submersible pump could also
be used. I've included an internal box overflow in the tank
for this example as they are fairly common and quite useful.
If an external canister filter is used, then an overflow may
not be needed, although they are still very useful for skimming
the tank's surface. Once the pump(s) is located external to
the tank, the plumbing requirements become more complex.
Unless a submersible pump is used (see
Parts
1 & 2
in this series to help determine which type is best for your
application), there must be some way of getting water from
the sump to the pump. This is normally accomplished through
the use of a bulkhead fitting which attaches to the sump through
a hole drilled into it for this purpose. The bulkhead fitting
allows the attachment of pipe or tubing to the sump which
can, in turn, be connected to the pump's inlet. Theoretically,
a siphon could be used to connect the pump to the sump, but
I find siphons, unless part of a closed canister filter system,
to be very unreliable. They are often difficult to start and
I do not recommend them. Another recommendation is that the
bulkhead fitting be located as low in the sump as possible,
and an elbow fitting used to lower its input to just above
the sump's bottom. This low inlet to the pump helps in several
ways: first, it allows the pump to operate until the sump
is nearly empty; second, it also keeps larger objects from
getting sucked into the pump (you could also use a pre-filter
but that requires periodic cleaning) and third, it makes it
easier to prime the pump. Priming the pump refers to filling
its inlet and wetted portions of the pump with water; this
is necessary in most centrifugal pumps to start them pumping.
Very few aquarium pumps are self-priming or able to suck water
into their inlet, unless they have water in them prior to
applying power to the pump; locating the inlet of the pump
below the water level in the sump provides an easy way of
automatically priming the pump via gravity flow.
I have also showed the control valve on
the outlet of the pump in Figure #3 in a position to adjust
its flow rate. The inlet service valve could also be used
to control the pump's output, but most pump manufacturers
recommend against this practice. With powerful pumps and/or
too much throttling of the flow, cavitation may occur in the
pump, thereby harming it. One reason for placing a valve on
the inlet side of the pump (service valve in this example)
is that this valve, in conjuction with a union, will allow
me to remove the pump for maintenance without having to drain
the sump. The unions are the fittings located between the
pump and the valves (see Plumbing
101 for additional information) and allow the disconnection
of the pump by unscrewing the union, after first having closed
the valves to prevent water loss from the sump and tank (there
will still be some mess from the water in the pump, but it
can normally be managed with minimum effort). Most pumps require
very little maintenance, but should be taken apart for cleaning
at least once a year to make sure they continue to operate
at peak efficiency. Additionally, some pumps require periodic
oiling of certain parts (check with the manual supplied with
the pump). As I've often said in the past, maintenance of
this sort will usually only get done if the work required
is minimal, and a plumbing configuration as described above
will make this job a lot easier.
While I have mentioned connecting the pump
to the sump, I have not yet said anything about where the
pump is placed, or how it is mounted, besides the requirement
that the pump's inlet be placed below the sump's water level
to help prime the pump. The most common arrangement for a
pump in this type of configuration is to place it adjacent
to the sump on the same support surface. There are a couple
of reasons that you may wish to modify this configuration
slightly by elevating the pump from the sump's support surface.
A non-submersible pump is called that for the simple reason
that it will be damaged if water gets into its motor, or if
its case is subjected to prolonged contact with water (especially
saltwater). As most surfaces around a sump are subject to
occasional splashes or overflows, it is a good idea to minimize
the amount of moisture to which the pump is exposed by slightly
elevating the pump (generally 1/2" is sufficient) above
the sump support surface. Another good reason for elevating
the pump is to reduce the noise of the pump's operation.
Pumps, by their very nature, make noise,
mainly through vibration of their housings due to the rotating
components. While some of this noise is transmitted directly
to the air, it is often the case that much of this noise is
caused by transmitting vibrations to other surfaces, such
as the floor that the pump is placed upon. This noise may
be significantly reduced if the pump can be acoustically isolated
from the mounting surface. Acoustically isolating the pump
reduces its vibrations by dampening or deadening them before
they are transmitted to the floor or other mounting surface.
The best way of accomplishing this is to use a piece of 1/2"
thick rubber mat between the pump and the mounting surface.
The mat will provide good support while helping to dampen
the vibrations of the pump. I've also been told that indoor/outdoor
carpet will work well. Whatever material you use for a pump
mat, it must do three things: provide adequate mechanical
support, dampen mechanical vibration and not be damaged when
it gets wet.
I have assumed so far that only rigid pipe
has been used, and while flexible tubing could be used, it
is normally better to use rigid pipe to help support the inlet
valve and to make it easier to adjust. On the outlet side
of the pump (or the outlet union if you are using one), you
may use either rigid pipe or tubing. If you have to support
additional filter stages between the pump and the tank, then
rigid pipe is preferable for the added support it provides.
Alternately, if you need to route the plumbing to the tank
through twists and turns, then flexible tubing offers many
advantages. These include the ability to make more gradual
turns, creating lower pump losses (see Part 2 of this series),
which, in turn, results in higher available flow rates from
a given pump. Do not be afraid to mix both pipe and tubing
where appropriate. Some words of caution: as the tubing diameter
increases (>1"), its flexibility decreases, thereby
reducing its advantage unless long runs are planned (where
limited flexibility may still help).
The final example I wish to discuss is
the return to the tank itself. Notice that in this example
(Figure #3) the return is located at the surface of the tank.
The return could be extended to go to the tank's bottom (shown
in dashed lines), but there are potential problems in doing
this. If the return is below the surface of the tank and the
power is shut off, then the return will act like a siphon,
and the tank will drain into the sump until the level in the
tank is below the return's end, possibly draining the entire
tank. This problem may be avoided problem in a couple of ways:
by either using check valves in the return lines or by placing
a siphon break in the return near the surface of the tank.
If you use a check valve (a check valve only allows water
to flow in one direction), position it so you can easily remove
it to periodically clean it as it can get dirty from debris
or internal growths that could prevent it from working properly.
My favorite position for a check valve, if there is adequate
space, is inside the sump on the incoming side of the bulkhead
fitting (see Figure #3). A siphon break is nothing more than
a small hole drilled in the return near the surface of the
water (see Figure #3). When the power is shut off, the hole
allows air from the surface to be sucked into the return and
breaks the potential siphon. A word of advice - it is very
wise to do a power cycle check on any aquarium system. This
means shutting the power off for a short period of time and
making sure nothing unusual happens (e.g. tank draining, sump
overflowing, etc.) You can then turn the power back on to
see if all the pumps, filters, overflows, etc. start properly.
Example #3: Combination System.
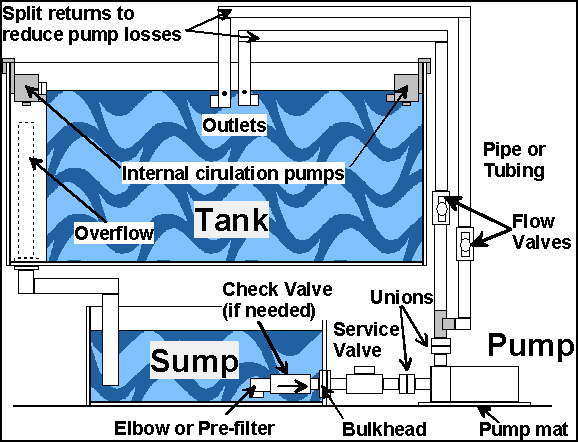
Figure #4 Combination external/internal
pumps example
This is my preferred aquarium configuration
for all but smaller systems or specialty situations, and involves
the use of both external and internal circulation pumps for
added reliability. The configuration shown in Figure #4, is
similar to Example #2, but has additional internal circulation
pumps to supplement the single external pump. For even better
reliability, or with a larger system, I recommend multiple
external pumps as well. When using internal pumps the external
pump(s) can be reduced in size (along with noise, cost, and
power usage), since not all of the circulation requirements
need be supported by a single pump. You also have more flexibility
in supplying good circulation to the whole tank since there
are multiple outlets directing the water. You may split a
single pump's return and get a similar effect, but without
the improved reliability and added protection acheived by
using multiple pumps.
You may potentially improve the circulation
in the tank even further if the internal pumps are placed
on timers, or if a wavemaker is used to alternate or randomize
the outputs of these pumps. This cycling of the pumps helps
prevent stationary circulation patterns in the tank and thus
better circulates all areas. Water constantly flowing in the
same direction can be especially bad for some corals or invertebrates,
as only one side or area of the specimen will receive good
circulation. Make sure that any timer or wavemaker used to
control the pumps is properly sized for the pumps you are
using (i.e., can handle the current requirements of the pumps)
and that the pumps being used can be reliably turned off and
on repeatedly by the wavemaker/switch being used.
Notice that the return to the tank in this
example is split at the output of the external pump into two
separate returns. While more complicated, this can be very
useful to reduce possible pump flow rate losses, especially
if a long run is required from the pump to the tank. As mentioned
in Part 2 of this series, a pump's flow rate losses due to
plumbing are greatly dependent on the velocity of the water
in the plumbing. By splitting the tank return into two separate
returns, you reduce the output velocity in half and achieve
significantly lower pump losses. You could alternately use
a larger diameter pipe/tubing for a similar effect, but having
multiple returns to the tank gives added flexibility in locating
returns in the tank to get the best circulation patterns.
In Parts 1 and 2 of this series on water
pumps, I strongly suggested that when using electrical equipment
around water, it is best to use Ground Fault Interrupter (GFI)
equipped electrical circuits to prevent electrical shorts
from becoming dangerous to either you or the tank. When a
GFI detects a short has occurred, it shuts the offending circuit
off. One possible danger to using a GFI circuit is that if
all of a tank's electrical equipment is connected to a single
GFI, then they will all be shut off until the short is fixed
and the GFI is reset. Having the whole tank shut off due to
one pump or other piece of equipment having problems is not
desirable. Ideally, there should be one GFI for each piece
of equipment; the use of multiple GFI circuits for different
pumps will maintain the tank's circulation in the event of
a problem and reduce the risk of a total shut-down. Strategically
grouping your equipment, so that if any one GFI trips it will
not seriously endanger the tank, is a wise course of action.
Another desirable electrical redundancy,
especially in larger systems, is to split equipment so that
it is divided between two or more separate electrical circuits.
A separate electrical circuit is defined by having its own
fuse or circuit breaker at the main power box. This allows
at least part of the tank to continue running even if a breaker
or fuse is tripped due to overloading or other potential electrical
failure. Again, you need to strategically group the various
pieces of equipment between the different circuits so that
the loss of any single circuit will not cause the entire tank
to fail.
This concludes my series on aquarium water
pumps. I hope I've given you a basic understanding of how
these pumps work (Part
1), how to go about choosing a pump for a given application
(Part
2) and, finally, some suggestions of how to install your
pumps to get the maximum performance and reliability out of
them (Part 3). Obviously, you can have any number of variantions
on the pump configurations mentioned, as well as some I did
not cover (in particular, use of metering or dosing pumps).
Don't be afraid to experiment and use some of the principles
covered in this series to optimize your tank(s) circulation
for your particular requirements. If you have a particularly
clever or different way of using pumps for circulation or
other aquarium applications, let me know what they are, and
I'll try to include them in a future update to this series.
|