|
Gorgonian Propagation Techniques
Why Would You Want to Do It?
Some photosynthetic
gorgonians have fast growth rates and have the potential to
sting other corals if they brush directly against them. Hence,
it may become necessary to prune gorgonians from time to time.
Additionally, it's beneficial to propagate in order to spread
corals in a sustainable manner, thereby reducing the draw
of corals from the reef.
Get Your Tools Together
Most forms of putty epoxy work well
for this project, but some are more expensive than others.
Some set up particularly fast, while others may be more tacky
to the touch (depending on the application, this may or may
not be beneficial), and some are colored similar to coralline
algae and may, therefore, blend in with your live rock more
quickly than others. Regardless of the epoxy's color, though,
coralline algae seems to have a propensity to grow on the
surfaces of all the putty epoxies. Small pieces of live or
dried base rock are useful as a mounting surface for gorgonians,
and, ideally, the mounting rocks will have a small hole suitable
for the insertion of part of the gorgonian. Sometimes rocks
can be drilled with a masonry bit to provide this hole.
|
Tools for propagating gorgonians.
|
The gloves shown above are a protective measure. I don't
consider myself as having sensitive skin, and I have no allergies
that I know of; however, I have developed a serious allergic
reaction to putty epoxy (a hazard of the life of a "fragger?").
I don't know if I'm allergic to only one type or all types,
but I think it's likely that some of the same chemicals are
used in all of the putty epoxies. Some carry warning labels
about the risks of allergic reaction. I had used putty epoxy
many times previously, always mixing it in my bare hands with
no problems. One day, though, an hour or so after mixing it,
I broke out in severely itching hives over much of my body
and came very close to visiting the emergency room. So…
I recommend the gloves for everyone. I usually "double
glove" because the outer layer of gloves can become very
sticky from the initial kneading of the uncured epoxy. Having
a clean glove surface to work with (by removing one set of
gloves) makes the project a little easier. Frequently wetting
the gloves with some tank water also tends to make their surface
less sticky to the epoxy.
Hack up the Coral
Gorgonians don't tend to ooze fluids
much during the fragmentation process, so I don't think it's
particularly important to remove them from a display tank
when cutting out branches for propagation. The branches can
simply be snipped from whatever area of the colony you like,
understanding that the thin-branched gorgonians might require
more cutting than you expect because branches that touch often
fuse together. I usually use a scissors because gorgonians
are easy to cut through, but cutting pliers or those nifty
"fragging" shears can be used as well. It might
also be worth mentioning that some gorgonians are very intolerant
of exposure and should be kept submerged. The ones described
here are not so sensitive, but seafans can be sensitive to
this condition as well as the gorgonian, Muriceopsis
sp. (common in the trade) and a host of others.
I regularly propagate three forms of gorgonian. The first
is likely Pseudoplexaura, originally from Honduras.
The left side of the photo shows the gorgonian with its polyps
retracted. This gorgonian's surface becomes smooth and almost
glossy in appearance with the coral's purplish tissue exposed.
The right side of the photo (below) shows the same gorgonian
with its polyps extended.
|
When this gorgonian is cut it is clear that the coral's
central core or gorgonin "axis" does not have
a clearly defined border.
|
|
The second gorgonian we'll be fragmenting is another
thick-branched gorgonian, likely a Plexaura,
obtained from the New England Aquarium in Boston. Also
shown in the photo, in the lower right edge, is a tank-raised
Fungia or Cycloseris, that will soon be
the topic of a propagation article.
|
|
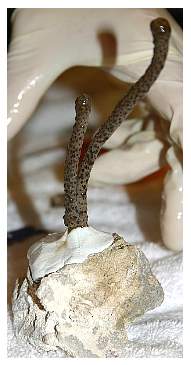
When this gorgonian is cut, its core is visible as a
clearly distinct tissue. The cut for this particular
fragment was made near a branch point, hence the two
central cores.
|
|
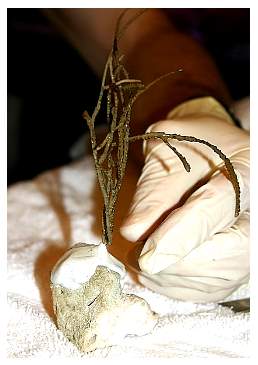
This thin branching gorgonian is likely Pseudopterogorgia
or Pinnigorgia. As this photo shows, this gorgonian
has a clearly defined central gorgonin tissue.
|
Once cut, examine the base of the cutting. Some species of
gorgonian have a clear demarcation of their central gorgonin
tissue. Others have a more diffuse boundary within their tissues.
Those with clear demarcation usually have a tough center that
is almost "wood-" or "stem-like" - the
gorgonin. For propagation, the tissue's outer, fleshy part
needs to be scraped away. While this can easily be performed
with a razor blade, care must be taken not to cut though the
gorgonin. The tissue should be removed from a length of about
one inch or more of the stalk.
|
Scraping tissue from the thick-branched gorgonian.
|
|
The clean branch, ready for mounting.
|
|
Scraping tissue from the thin-branched gorgonian.
|
|
The clean branch, ready for mounting.
|
It takes about a minute or two to knead the putty epoxy into
a well-mixed consistency. Once the color is uniform, mixing
is complete. Putty epoxy warms to some degree while it is
curing. Rolling it into a ball maximizes the warming and speeds
up the curing process, in case you are in a hurry. I prefer
to do the initial working of the epoxy onto the rock while
the putty is still soft and flows easily into small holes
in the substrate. I force the epoxy into the hole in the rock,
and then shape it into a small crater-like depression.
|
Left: Putty epoxy ready to press into the holes
and crevasses in rock. Center: Forming the epoxy
into a crater-like depression. Right: Epoxy ready
to accept the gorgonian fragment.
|
I usually wait a few minutes until the putty hardens slightly
before positioning the gorgonian fragment in the hole, and
then shape the putty around the stalk. I have found that it's
best not to embed any significant amount of the fleshy tissue
under the epoxy, because any tissue that is buried will die
and rot. If no fleshly tissue was removed before fragmentation,
then once the tissue rots (in a few days to week) any water
motion will dislodge the gorgonian fragment.
|
Left: Forming putty epoxy around the thick-branched
gorgonian; note that no tissue is covered with putty.
Right: Mounting the thin branching gorgonian.
|
 |
 |
After about 30-60 minutes the epoxy is sufficiently cured
for the coral to be placed back into the aquarium. It's important
that the fragment be returned to an area with good water flow
until any damaged tissue has healed. As is the case with most
soft corals, the best success rates are likely to occur if
the fragmented coral is returned to a tank with conditions
similar to those in which it was grown. Under good conditions,
the gorgonian usually grows new tissue down onto the attachment
point and hides some of the epoxy within a few weeks. The
technique described above also works for sea fans that have
a solid central core. Instead of putty epoxy, hot-melt glue
or gel-type super glue can also be used. Pretty much any technique
will work that holds the gorgonian's tissue stationary against
a suitable substrate without creating undue pressure on the
tissue. I've found, though, that the putty epoxy method is
the most reliable way to accomplish this.
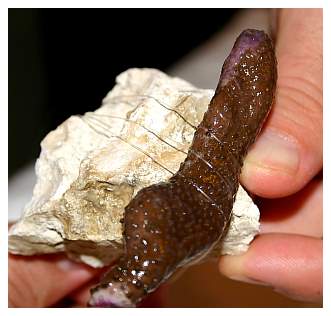
For gorgonians lacking a well-defined central core, the putty
epoxy technique cannot be used because the covered tissue
will rot. For these gorgonians I've found that simply strapping
the gorgonian fragment onto a rock works well. I gently wrap
the fragment with a few strands of monofilament fishing line,
and tie it off in the back. The trick to tying knots in fishing
line is to wrap one line around the other multiple times before
actually making the knot. The gorgonian fragment must be held
in place gently; if it is strapped down too hard, tissue damage
can result and the whole fragment may succumb to microbial
infection. If done properly, in several weeks new gorgonian
tissue will extend onto the substrate surface. Eventually,
the fishing line can be cut away and the gorgonian will sense
its new orientation and begin forming new, upright branches.
The disadvantage of this technique is that it may take some
time for the gorgonian to look like a gorgonian again.
 |
|
Immobilizing the thick-branching gorgonian that has
no distinct central core; the fishing line must not
be too tight or an infection may form where the coral
tissue is being crushed.
|
Happy Fragging!
Additional Reading:
Sprung, J. 2004. Caribbean
Gorgonians: Beauty in Motion. Advanced Aquarist.
3(3).
If you have any questions
about this article, please visit my author forum
on Reef Central.
|

