|
My goal here is
to teach the process involved in getting photos from the camera
to the computer to a Reef Central thread. Hopefully, this
article will help speed up the process and improve the quality
of images because, after all, time and quality are what it's
all about!
After taking a photo, the next step is to upload it to your
computer. If you directly connect your camera to the computer,
I recommend investing in a card reader. They are not expensive,
usually in the $20 price range and multi-format card readers
(compact flash, secure digital, etc.) are available, too.
There are distinct advantages to using a card reader, the
main one being that the camera does not need to be present;
no need to lug the camera to the computer, no need to plug
in the AC adapter or to make sure there's enough charge in
the battery to get the job done. Card readers also have the
potential to be very fast. If your computer has a USB 2.0
or Firewire interface, download speeds can be very fast. Regardless
of the speed, the ease of using a card reader compared to
uploading from the camera makes it a good investment.
Once the pictures are on the computer and you've selected
the image you want to post, the next steps are to touch up
the picture and resize it for web viewing. If you need an
image editing program, Irfanview
is a wonderful program that does many of the basic functions
and, best of all, it's free! Photoshop
is the standard program used by graphics professionals the
world over and if you have it, you're set; if not, don't worry.
Irfanview, or any of the many other less expensive programs,
can do the job nicely.
Here's a very important tip - never save the original file
with changes made to it! Make sure you have a copy of the
original unedited picture safely archived on your computer.
If and when you make changes to the original, save the new
picture as a separate file - that way you always have the
original to fall back on if a mistake is made.
A few thoughts on deciding what dimensions your image should
be are in order. Recent polls (Link
1, 2,
3,
4)
show that the vast majority of computer users' displays are
set at either 1024 x 768 or 1280 x 1024 resolution, so an
image size of approximately 800 pixels wide is a very good
starting point. Any smaller and it becomes hard to see detail,
and as the size gets bigger, not only does the file's size
increase but some people will have to scroll around to see
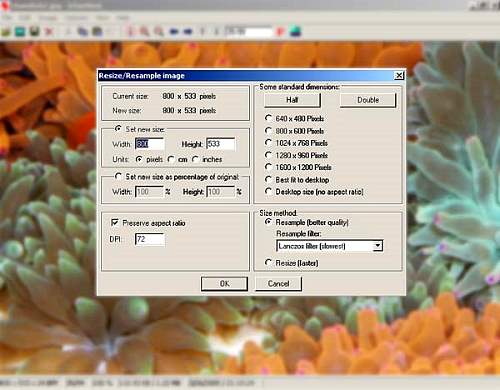
the whole image. First, I will explain how to resize an image
using Irfanview. Open a photo by clicking on File>>Open.
Navigate to the folder that holds your photos and then select
the image you want to work with, then select Image>>Resize/Resample.
See screenshot:
 |
In the Resize/Resample dialog box check the Set
new size radio button and enter 800 pixels in the Width
field. The height will be calculated automatically as long
as you have the Preserve aspect ratio button checked.
The DPI setting can be left at 72 because that is adequate
for sharing your pictures on the Internet and anything greater
is a waste of hard drive and bandwidth space. If resizing
for print, you'll want to set the DPI higher. On the box's
right side are some standard dimensions - using those are
just fine too as long as the aspect ratio of your picture
is the same as the standard size you choose. The default settings
of Resample (better quality) and Lanczos filter
can be left alone. Then click OK.
To resize an image with Photoshop, click on File>>Open,
then navigate to the appropriate folder and select the photo.
Then click on Image>>Image size. See the screenshot
below
Enter the desired width (800 pixels in this example) and
the height will be calculated automatically as long as the
Constrain Proportions button is checked. Scale Styles
and Resample Image [Bicubic] can be left in the default
[checked] positions. The Document Size section of this
dialog box can be ignored - again, that is typically used
when preparing an image for print. Then click OK.
Before saving the image, you might want to do some basic
enhancements to make it look as good as possible. For simple
and effective enhancements in Irfanview, click on Image>>Enhance
colors. You can adjust the brightness/contrast, make color
adjustments and saturate the whole image if you so desire.
Small adjustments are advisable. If the image needs more than
that, then it's better to either choose another image or to
take the photo again if possible. Once your adjustments are
made, click OK. Next click on Image>>Sharpen.
One click is usually enough and it is almost always necessary
to sharpen images from digital cameras. Over-sharpening is
easy to do, and it can seriously degrade the picture's quality
as well as greatly increase its file size, so careful use
of this feature is important. Unfortunately, Irfanview can
sharpen only the entire image; Photoshop can sharpen specific
portions of the image.
Obviously, Photoshop can do a lot more than Irfanview to
manipulate an image, hence its hefty price tag. With your
image open in Photoshop click on Image>>Adjustments
- this is where adjustments are made to the brightness/contrast,
color balance and saturation. The pros use Levels and
Curves to fine-tune the exposure, and I highly recommend
using theses tools but remember - small changes go a long
way! Our goal here, though, is speed; quick changes can be
made by using the Auto adjustments for Levels,
Contrast and Color. It's likely, though, that
the auto adjustment will be a little too much - not to worry,
there is a quick and easy way to scale it back: click on Edit>>Fade
Auto Levels. Make sure the Preview button is checked,
and you'll be able to see the adjustment fade as the slider
is moved to the left. That feature can be very valuable.
After making the color and exposure adjustments, click on
Filter>>Sharpen. You can use the very simple
Sharpen filter to sharpen the whole image by a default
amount. If you choose that option and find that the image
looks oversharpened, try clicking on Edit>>Fade Sharpen;
this will open a dialog box with a slider that allows gradual
reduction of the last filter/adjustment that was made. A more
advanced (and recommended) way to sharpen photos is to use
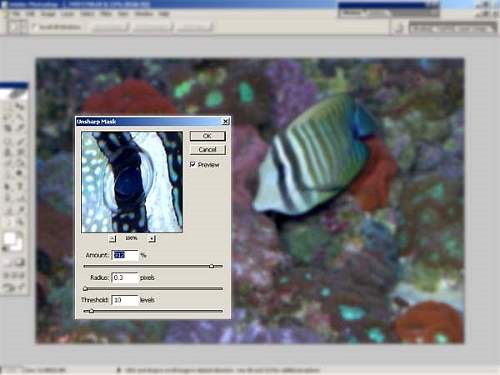
Unsharp Mask. Click on Filter>>Sharpen>>Unsharp
Mask; this opens a dialog box that has three sliders.
As a good starting point, set the Threshold to 10 and
the Radius to 0.3. Your eye will have to determine
the amount - and it'll be anything up to a level of 500:
 |
The second half of the process of posting photos that shrinks
the file's size is compression. It's a critical step, and
choices made here will determine the picture's final file
size as well as how the picture will ultimately look. Be careful,
though; too much compression leads to a very small file but
can also result in a picture lacking in detail. There's a
good compromise but you just need to train your eye to find
it! Look closely at any smooth areas that lack detail and
watch for pixelation (blocky patches). Also look at any clear
margins where there is a sharp line; if you see noise or pixelation
there, the picture is either over-sharpened or over-compressed.
A big size savings results when the image is reduced to 800
pixels wide, and to reduce the file's size even more, try
compressing the image using an image editor. First, I'll describe
the steps involved when using Irfanview. Click on File>>Save
as and two boxes pop up:
The largest box is a typical Explorer window that allows
you to rename the image and place it into the desired folder.
The smaller [gray] box is where the compression level is chosen.
The more the image is compressed by sliding the slider to
the left, the smaller the file's size will be. Generally speaking,
a value in the range of 50-60 is a good place to start; much
lower than that and artifacts (noise) will begin to show which
can really take the impact out of a good picture. The default
settings for this program are generally good; leave the first
three boxes unchecked and the last three checked. A .JPG is
the standard image format for posting images on Reef Central,
so save all images in that format.
In Photoshop, the process has a few more options and allows
much greater control. ImageReady is the file saving utility
by Adobe; it's fast and efficient. If you have one of the
more recent versions of Photoshop, it comes with ImageReady.
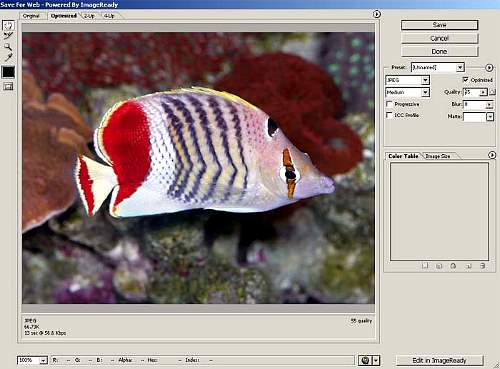
To save an image with ImageReady click on File>>Save
For Web and ImageReady will launch in a separate window:
 |
The image appears with four tabs above it: one for the original
uncompressed image, another for the image with the compression
applied, a third tab that allows you to see a split-scene
of the "before/after" versions, and a final tab
that shows a preview of three different compression levels
plus the non-compressed original. The compression level and
the compressed file size are displayed for easy viewing and
this makes things very simple since all the data is right
there. With Irfanview, or by using the "Save as"
method in Photoshop, you cannot see how the final version
of the image will look without actually going through all
the steps and then opening the saved image in a separate window.
If it turns out that too much compression was used (e.g.,
you see noisy artifacts such as halos and or pixelation),
then the whole process must be repeated.
As with Irfanview, a compression level of 50-60 is a good
place to start. Images that have big areas of little or no
detail, like a blue sky, will require less compression because
artifacts are more visible in those areas than in other areas.
In the drop-down menu, be sure to select JPEG for
the file type, check the Optimized button and set Blur
to zero. The Quality drop down menu lets you control
a slider for the compression level, but if you don't want
to use the slider, the compression level's exact number can
be entered in the Quality box. The Progressive
and ICC profiles buttons should be left empty for this
simple compression task. Below these buttons is another small
box that allows quick image resizing, too - simply enter the
desired image dimensions and that's all there is to it.
Now you have a file that is fit to display on Reef Central,
or anywhere on the Internet for that matter. The next step
in the process is to get the photo hosted on the Internet.
If you don't have a website, don't worry - in addition to
the free gallery provided to registered members on Reef Central,
some very good, even free, image hosting services are available.
A few such sites are: Reefbucket,
Photobucket,
Smugmug,
Pbase,
Flickr,
Snapfish,
Imageshack,
TinyPic,
The
Image Hosting, and many more. Be sure to read the terms
of service to make certain you retain the copyright to your
photos and that the images are to be used only by you, the
photographer.
After either going through the process of opening an account
at one of the sites listed above or by using an existing website
or Reef Central's image gallery, you're ready to upload photos.
Uploading pictures to a web hosting site works like any file
moving operation - there is a Browse button that allows
you to navigate through your computer's file system; find
the folder that holds the photo(s) to be uploaded and then
click OK. It's as simple as that!
Some of the above-mentioned image-hosting sites provide the
image's address (and sometimes even the source code with the
tags already in place) right under the picture, so all you
have to do is copy the address. Copy the address by dragging
the mouse over the address while holding down the left mouse
button; once the whole address is selected, and only the address
(it typically starts with "http" and ends with ".jpg"),
right-click and select Copy (for Windows users), or
highlight and select Copy or Command C (for
Mac users). If the address isn't so conveniently displayed,
copy the image address from the address field at the top of
your browser. The address will look something like this: http://www.yourhost.com/youraccountname/yourimagename.jpg.
If the address at the top of the page does not end in ".jpg,"
the picture is most likely embedded in the body of the web
page, and you'll need to follow a couple more steps to get
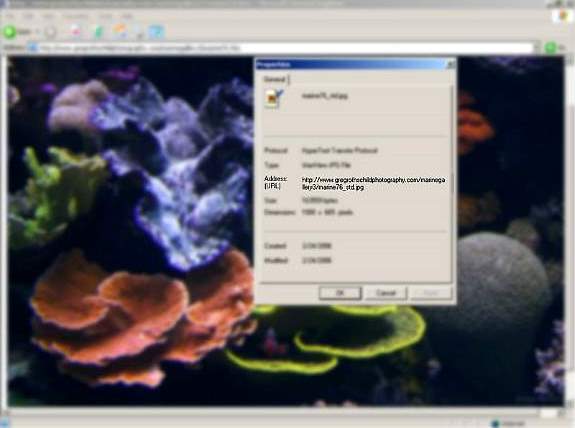
to the photo's actual address. Right-click (for Windows users)
anywhere on the image that you want to post and select Properties.
In the dialog box that pops up you will see the address (URL)
listed, and it will end in ".jpg." That is the address
to copy (see screenshot below).
 |
In a separate browser window, open the Reef Central thread
you want to place your photo into. Click on the Post Reply
button and look at the buttons above the field where you enter
your text. Below the smilies, you will see a row of buttons
for Bold, Italic, Underline, Font
Size, Type and Color -the row below that
is where you look. Click on the IMG button and a box
pops up. You will see that an http:// is already there - this
is to let you know that this is where the image's address
goes. Paste the image's address into this box by clicking
once in the box, right-clicking and then selecting Paste.
You will see the address that you copied in the previous step
appear in the box. Be sure that only one http:// is at the
beginning of the address. Finish typing your reply, then click
the Submit Reply button.
If you've followed the directions and your photo does not
appear, then the first thing to check is that there aren't
any typographical errors (using the copy/paste feature is
highly recommended). Also make sure that the address of the
photo ends in ".jpg;" if it doesn't, you are probably
copying the address of the wrong file. Another possible error
is clicking on the wrong button in the vB code section - make
sure you click on the "IMG" button and not
the "http" button. Extra spaces in the address
box can cause the image to not be displayed too - be careful
to copy only the picture address, the whole address
and nothing but the address!
Additionally, some websites use anti-leaching code in their
pages to prevent other sites from using (stealing) their bandwidth.
A byproduct of the code is it can cause trouble with firewalls;
if you're seeing red x's where graphics or picture files should
be, the problem may be caused by the anti-leaching code conflicting
with too strict firewall settings. Check to see if your firewall
is set to stealth-mode - if it is, try a less strict protection
mode to solve the problem.
You are now an expert image poster!
|

