|
While many of the
readers of this online magazine are surely experienced enough
to have performed some basic coral propagation, in this article
we will introduce and display a few unusual techniques. Our
hope is to inspire less experienced aquarists to take a chance
and fragment some of their own corals while also demonstrating
some new tools and techniques for the more advanced aquarists.
We do, however, wish to emphasize the importance of using
these techniques only on healthy, well-fed, well-established
and growing specimens. The all-too-often seen pattern of fellow
hobbyists and basement e-tailing operations attempting to
make fragments of yet other fragments, or the practice of
slicing and dicing freshly imported or acquired, so-called
"rare" corals to quickly make a buck, is disturbing
to say the least. This practice is not a recipe for success
and, if continued, almost undoubtedly will eventually lead
to a total loss of the involved specimens. Corals that have
suffered their way through the collection, distribution and
retail chain of custody, at times having dealt with insufficient
lighting, questionable water quality, and/or the physical
abuse of being bagged and shipped, are not prime candidates
for fragmentation. They have likely used up a significant
portion of their energy reserves simply to survive such conditions
and expecting recovery from imposed propagation before stabilization
is just too much for many of them to survive. We all should
remember that we are dealing with live animals, and act appropriately
with due respect for the animals under our care.
Two of the three techniques outlined below are for corals
with solitary large polyps. Unlike corals with large numbers
of colonial polyps, which can recover more easily from significant
tissue loss, cavalier approaches to fragmenting solitary polyps
can lead to the loss of the entire animal along with any fragments
made. But, be assured that healthy, well-established corals
can tolerate and recover quite well from these imposed propagation
techniques.
Tools of the trade. Photos by Steven Pro.
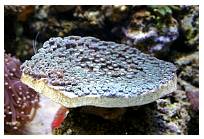
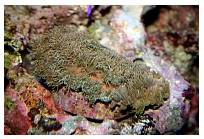
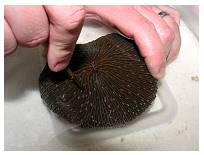
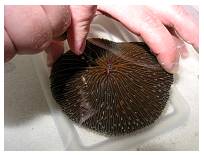
Making a Turbinaria peltata "Doughnut"
One of the key considerations for
aquarists with most coral propagation efforts is that the
mother colony remains attractive after the procedure is complete,
particularly if the propagated specimen is being kept in a
display aquarium. If the propagation being done is for the
express purpose of making money, as in a commercial coral
propagation facility, and the appearance of the broodstock
is of secondary concern, the effectiveness of the procedure
and the number of viable fragments made may take precedence
over the appearance of the parent colony. But, most of us
are hobbyists performing propagation to control growth in
our displays, a sort of aquarium version of Bonsai trees,
so the specimen's final appearance is a high priority. In
one particular instance/our case, the Turbinaria
had grown so large that a magnetic cleaning device could no
longer pass between it and the glass and it had grown close
enough to a neighboring
Torch coral (Euphyllia glabrescens) that they had
begun to battle, with the less competitive Turbinaria
being on the losing end of this fight.
Turbinaria are extremely hardy, durable, and resilient
corals. These attributes make them great corals for a first
propagation attempt. And, while all that is necessary to successfully
propagate a plating Turbinaria is a hard wall to throw
it against and smash it into pieces, what we are going to
demonstrate will still yield a multitude of fragments while
maintaining an attractive and natural-looking parent colony.
If anyone is not familiar with Anthony Calfo's "Book
of Coral Propagation," we (and especially our good friend
Anthony!) would urge readers to buy and read this book. In
it, Anthony describes propagating a common Toadstool Leather,
Sarcophyton, by a means he terms the "doughnut"
technique. Below is a brief excerpt detailing this procedure:
"For smooth, mushroom-capped Alcyoniids, an aggressive
but very prolific technique can be administered. In preparation,
a clean cutting board should sit in waiting with a very
sharp scalpel or single edged blade ready nearby. The polyps
are to be fully retracted on the 'head' (capitulum) of the
leather coral. When ready, the aquarist is to remove the
animal from the aquarium system and invert the creature
on the cutting board. That is to say, place the animal upside
down on its 'head.' Then carefully incise (cut away) a full,
one-inch/2.5 cm ring of tissue from the outer edge of the
facedown-crown of the animal. When complete, a doughnut
of tissue will have been cut away from the donor. The accosted
parent is to be returned to the aquarium in the exact same
place and position that nurtured it to the point just prior
to the propagation technique. The severed ring of tissue
is then to be chopped into portions, perhaps one-inch square.
The fragmented divisions may then be thrown into a rubble
trough for natural settlement and growout, or secured individually…"1
In the case of fragmenting a Turbinaria, much of the
propagation technique is the same as for the Sarcophyton
described above. The polyps are "waved down" before
removing the specimen from the water. But, instead of cutting
through the spongy tissue of a soft coral with a scalpel,
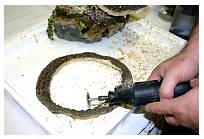
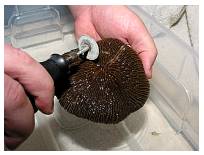
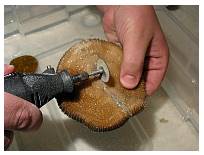
we used a Dremel-style rotary tool and a side
cutting bit, also sometimes called a drywall bit or spiral
cutting bit, to cut the tissue and underlying skeleton. These
bits look somewhat like a normal drill bit except that the
spiral groove has a flared edge which allows the spinning
bit to dig into material sideways. These were first seen and
popularized by the Roto-Zip people and their infomercials.
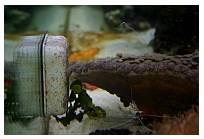
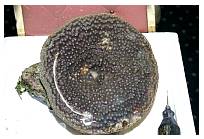
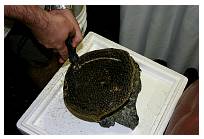
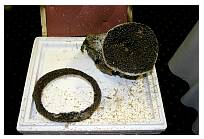
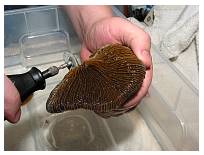
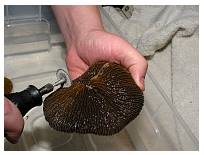
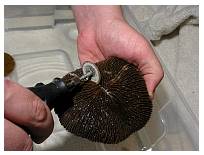
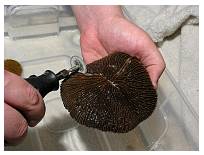
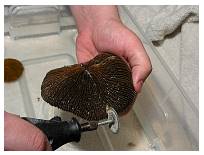
A hole
is drilled through the coral, approximately one inch from
the side. Then the rotary tool is worked
around the coral maintaining a radius such that a one-inch
ring is removed all the way around the coral. After the
outer one-inch "doughnut" of coral is removed, it
is cut
further into approximately one inch squares. After cutting,
both the parent colony and individual fragments are rinsed
in clean saltwater to clear them of tissue and skeletal debris.
Photos by Steven Pro.
We wish to say how particularly impressed we were with the
performance of the side cutting bit. It was quite a bit more
maneuverable than the more standard disk cutters used with
these rotary tools. These have a limited cutting range because
the depth of the cut is limited to the diameter of the cutting
disk. And even then, many times the base of the rotary tool
gets in the way, running into the coral and further limiting
the cutting range. But, this is not the case with these side
cutting bits. They are quite nimble, actually, and one could
see them being used quite a bit in coral propagation efforts.
One instance that comes to mind where they would be particularly
adept is navigating your way in the valleys between the shared
walls of the so-called closed brain corals.
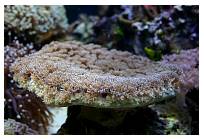
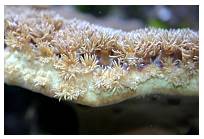
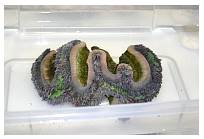
In our case, we decided to attach the fragments to aragocrete
(sand and concrete) plugs with super glue rather than leaving
them loose. Within a relatively short period of time, the
little squares should begin to round off and take on a plate-like
appearance. As for the parent colony, within a month it
had healed
almost completely. Tissue grew over the exposed skeleton
in a matter of days, followed soon thereafter by new
polyps.
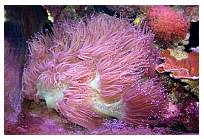
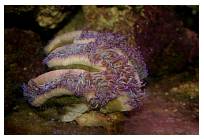
Fragmentation of an Elegance Coral, Catalaphyllia
jardinei
Fragmentation is common in stony corals
that contain large numbers of colonial polyps (Acropora,
Montipora, etc.) and in those with multiple individual
polyps such as phaceloid forms of Euphyllia. On the
other hand, stony corals that exist as fused or conjoined
polyps such as Catalaphyllia, Plerogyra, Fungiids,
etc. present several special challenges, and are generally
not regarded as good candidates for fragmentation. Many solitary
polyped corals generally have heavy, bulky skeletons which
are more challenging to cut. There is also the very understandable
concern of losing the entire animal if the fragmentation is
not tolerated. Of course, this is the case with any propagation
effort. But, it would seem that the risk is perceived to be
greater among aquarists when dealing with these types of corals.
It appears that the comfort level is high when it comes to
breaking or cutting the 'little sticks' that we grow, as evidenced
by the multitude that are available for trade or sale, but
talk to a group of hobbyists about cutting through a large
fleshy polyp and they usually become very squeamish. Additionally,
fragments of large polyped corals are thought to take longer
to grow into "normal looking" marketable colonies,
but that is not the case with Elegance corals as one will
quickly see.
Several factors motivated the fragmentation of this particular
specimen. The coral had grown too large for the space available
to it in the aquarium and had begun to cause significant damage
to neighboring corals with its stinging nematocysts. Also,
because of the recent apparently poor survival rates of freshly
imported Catalaphyllia, it is our hope that this demonstration
will encourage thoughtful propagation of healthy specimens
that have been successfully kept in captivity for some time,
while sparing wild collected animals an almost certain death.
Last, but certainly not least, healthy specimens of Catalaphyllia
were needed by Eric Borneman for his Elegance
Coral Project,) which seeks to identify the causes of
this coral's currently poor survival rate.
Although the fragmentation procedure that was chosen for
this coral is fairly simple, a lot of planning went into the
process to maximize both pieces' chances of survival. The
following paragraphs outline the steps taken and their rationale.
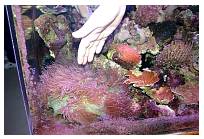
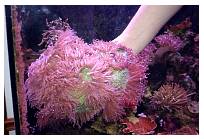
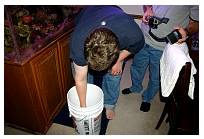
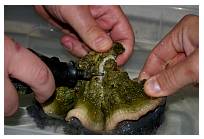
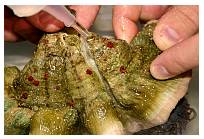
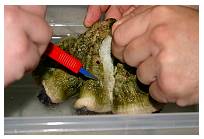
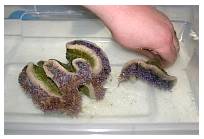
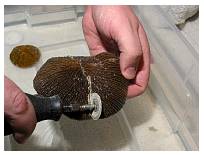
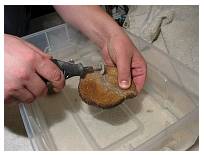
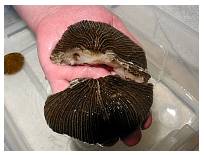
Before removing the coral from the aquarium, it was gently
"waved
down" and shaken
in order to retract its polyps, to prevent damage to the polyps
caused by the weight of its own water-filled tissue when removed
from its aqueous environment. Note the ridge on the skeleton
where the growth pattern changed. All growth above this ridge
occurred during the 16 months when the coral was in the care
of Adam Cesnales.
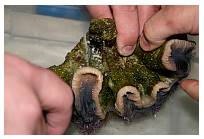
The coral was placed
in a flat tub that was deep enough to cover it, but shallow
enough to work easily. This allowed the coral to be manipulated
and cut with its skeleton out of the water, but with its tissue
remaining submerged.
Both authors recalled reading reports on the Internet of
an interesting technique for propagating wall-type large polyped
stony corals such as this, but it would appear that the original
webpage has disappeared in cyberspace. In these reports, the
skeleton was divided, but not the living tissue. A wedge was
then placed between the parts, and the connecting tissue was
allowed to separate on its own. This technique was obviously
born out of fear of cutting large amounts of living tissue.
We decided that this would serve only to impede water flow
to the tissue that inevitably would be damaged in the process,
so this plan was rejected. Causing as little tissue damage
as possible remained an important goal, so a significant amount
of time was invested to choose the best place to cut. A part
of the coral was chosen that would be both accessible to the
cutting tool and that would render two attractive coral pieces,
while at the same time minimizing the disruption of living
tissue.
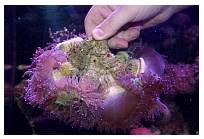
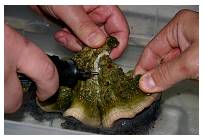
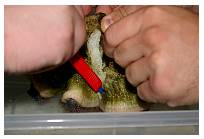
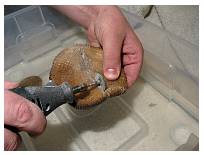
When a location was chosen for the cut, the same type of
rotary tool equipped with a side-cutting bit was first plunged
through the skeleton near the polyp. The cut was then
extended outward, away from the tissue toward the edge of
the skeleton. This offered much greater control than trying
to initiate the cut from the edge of the skeleton and then
moving toward the polyp. Also, this type of cutter (as opposed
to a disc) allowed the skeleton to be cut all the way through
in a single pass, thereby making a cleaner cut. The skeleton
was much more friable than expected and the cutting tool passed
through it with minimal resistance.
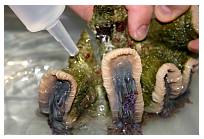
The cut was then extended toward the polyp. A bulb syringe
was used to irrigate
the cut, clearing away the grit and making it easier to
see. The intent was to cut most of the way through the skeleton
and then break the last 1-2cm, thus avoiding contact between
living tissue and the cutting tool. While still cutting about
3-4cm from the polyp, however, a white pasty substance began
to run from the cut. Since living tissue obviously had been
encountered more deeply into the skeleton than expected, the
cutter was stopped and the remaining skeleton was broken.
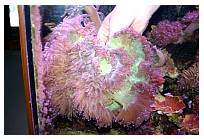
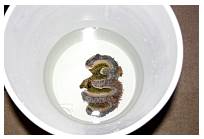
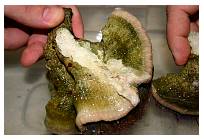
Once the skeleton was separated, a scalpel
was used to carefully cut the tissue connecting the two
pieces. Mesenterial filaments, as well as other tissue, were
clearly visible at the margins of the cut, and the living
tissue extended surprisingly deeply into the skeleton. As
the reader can imagine, a prized coral with its "guts"
hanging out is not a comforting sight!
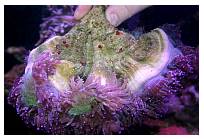
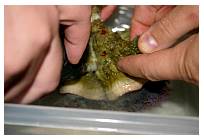
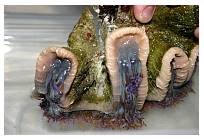
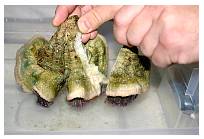
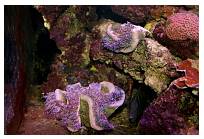
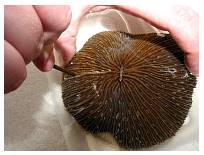
The new fragments were returned to the original display and
placed as closely to their original location as possible to
avoid any additional stress from changes in lighting or current.
The fouled water that contained the coral during the fragmentation
process was discarded. The authors then took a short lunch
break and in the amount of time it took us to consume some
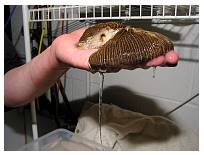
pizza, chicken wings, and a few beers, both portions of the
coral had expanded to nearly normal size. This image
was taken about five hours after fragmenting the coral. Cleary,
the procedure was tolerated well! Within about two weeks,
new tissue had covered the cut edges.
Photos by Steven Pro.
Fragmentation of a Fungia sp.
As mentioned previously, one of the
obstacles to fragmenting large polyped stony corals is the
resulting unnatural looking fragments and their slow growth
rates. Perhaps no group of corals suffers from this more than
do the Fungiids. These corals can be propagated with good
survival, no matter how oddly the fragments may appear afterward.
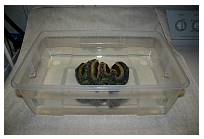
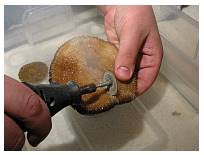
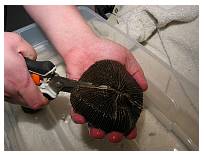
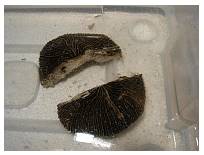
As in the other examples, this Fungia sp. (below)
was moved into a pan of water that allowed for easy handling
of the coral. The coral was then quite simply cut in half
using a disc cutting attachment on a rotary tool. Admittedly,
this turned out to be a poor choice as the remarkably hard,
dense skeleton stubbornly resisted the tool. Future experiments
will most certainly use more aggressive tools such as band
saws or chisels!
In addition to cutting the coral, the authors deeply scored
one fragment across its septa, and deeply scored the other
parallel to its septa. This was done in an attempt to stimulate
the formation of anthocauli,
or daughter satellite sites where a seemingly dead and denuded
parent begins to decalcify and issue buds
from along the septa of its corallum. This occurrence is well
documented in damaged Fungiids. We also hoped to discover
which type of damage would more reliably stimulate anthocauli
formation.
The set of photos above are courtesy of Anthony Calfo.
As in the previous examples, the fragmented coral was returned
to the same spot in the aquarium from which it was taken,
and the fouled water from the pan was discarded. Within a
couple of weeks, the tissue at the margins of the cuts was
well healed, and within a month, new tissue had completely
covered the cut edges. Several months later, both pieces are
still alive and appear healthy, but have not formed new mouths
where the original one existed. In hindsight, the formation
of new mouths would probably have been more likely if the
cut had been made across the mouth as opposed to parallel
to it. Even considering Fungia sp.'s normally slow
growth rate, new growth in this coral has been disappointing.
This coral's inability to feed is undoubtedly contributing
to its slow growth.
In addition, all of the scoring healed well, but no anthocauli
were produced. Take note that even after apparent "abuse,"
the worst thing that happened was that our efforts did not
force the coral to produce daughter colonies. These were rather
aggressive techniques and yet the coral survived. The key
was how well it was cared for leading up to, and after, the
propagation occurred. Again, we would not recommend this or
any propagation technique on newly acquired animals.
Overall, despite the survival and apparent good health of
the Fungia fragments, they probably remain poor fragmentation
candidates. Only the very fastest growing specimens have any
hope of becoming large enough and normal looking enough in
a reasonable amount of time. The best methods for propagating
these corals will probably revolve around finding a reliable
method to stimulate anthocauli formation.
Summary
Throughout these procedures no dips
or prophylactic treatments of any kind (iodine, antibiotics,
etc.) were used. It is the authors' opinion that healthy,
established corals resist infection very well when provided
with good water quality and water movement, and that the indiscriminate
use of such prophylactic treatments is not warranted.
In our excitement to demonstrate and record these techniques,
the authors shamefully forgot to apply gloves and wear eye
protection. Gloves provide needed protection against tissue
on tissue contact, which could possibly lead to infection.
Flying shards of coral fragments encountered while drilling
into coral skeleton is another area where the aquarist is
advised to wear some sort of eye protection. While we encourage
readers to experiment with new techniques, we also hope that
they will be considerate of their own health and saftey as
well as that of the corals when performing these techniques.
In closing, we hope that we have presented techniques demonstrating
that large polyped stony corals can be safely propagated and
that "show" colonies can be aggressively fragmented
while remaining aesthetically pleasing. Moreover, we hope
that our experience will inspire others to thoughtfully experiment
with new fragmentation techniques and to share their experience
for all of our benefit!
Acknowledgements:
The authors wish to give special thanks
to our mutual friend Anthony Calfo for his advice and counsel
in attempting these propagation techniques as well as his
assistance in editing this article. Also, a special thanks
to Erik Carrillo for the Fungia anthocauli pictures.
If
you have any questions about this article, please visit my author
forum on Reef Central.
References:
1. Calfo, Anthony. 2001. Book of Coral Propagation. www.readingtrees.com
Monroeville, PA, page 383.
|


)
)
)


)
)
)
)
)
)
)
)
)
)
)
)
)
)
)
)
)
)
