|
Wouldn't it be nice
if your fish stopped and posed when you wanted to take a picture
- maybe perching conveniently on top of a particularly photogenic
coral? Alas, that is a rare event unless your tank is full
of Clown Gobies!
A Green Clown Goby (Gobiodon astrangulatus) perched
in Alveopora.
The real challenges for photographers are
fish that, like Tangs, Angels and Wrasses, never seem to stay
still for even a second. The following information will help
you learn how to get nice, crisp shots of your fish.
Understanding how a camera works will go
a long way toward helping you maximize its, and your, fish-photography
capabilities. The camera is basically a fancy box that holds
the film, or sensor. Attached to the box is a lens. Behind
the lens is an opening, whose size is adjustable, called the
aperture. Between the lens aperture and the sensor is a shutter;
think of the shutter as a curtain that opens and closes for
a precisely measured amount of time, allowing light to pass
through the aperture, hit the sensor, and be recorded as a
picture. That measured amount of time is the shutter speed.
Shutter speed is measured in fractions of a second. The smaller
the fraction, the more rapidly the shutter must open and close.
Consequently, the faster the shutter moves, the less time
it is open to allow light to pass. Aperture size and shutter
speed changes are calculated in ratios related to the amount
of light allowed to pass through the lens. These ratios are
referred to as "f (or focal) stops." Each doubling
or halving of the shutter speed or aperture size represents
a one-stop change. Contrary to what seems logical, the larger
the aperture f-stop value, the smaller the actual size of
the aperture. This is because the aperture value is the ratio
of the focal length of the lens to the diameter of the aperture.
Thus, an aperture of f4 on a 100mm lens is a 25mm opening.
One other important part of the camera
is the light meter. The light meter measures the amount of
light hitting the scene in the viewfinder. The scene is broken
up into sections, or zones, with each zone given a value.
The center zone is given the highest value and the outer edges
the least. Without getting too technical, let's just say that
the light meter in most cameras may be thought of as a series
of small photovoltaic cells wired in a predetermined manner.
The total current generated by the cells is "read"
by the camera to indicate exposure. Depending on the wiring,
and the sophistication of the meter, various portions of the
image may be read or weighted differently to provide different
exposures. The current value is simply read and compared to
predetermined values and that gives the meter value.
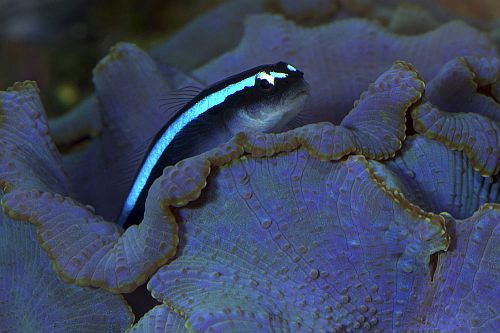
This Mystery Wrasse (Pseudocheilinus ocellatus) is
in good focus, but the
background is soft so the viewer's attention is drawn to the
subject.
On all but the most automatic point and
shoot cameras the three variables - aperture, shutter speed
and ISO - are adjustable. ISO stands for International Standards
Organization and is a measure of the light sensitivity of
the film or sensor. Adjustments are measured in "f-stops"
or just plain "stops." One stop is double or half
the previous value. For example, that means that a shutter
speed change from 1/60th
to 1/30th, or from 1/60th
to 1/125th represents a
one-stop change. Moving from f4 to f8 is a two-stop change
(f4 to f5.6 to f8). Changing the ISO from 100 to 800 is a
three-stop change (100 to 200 to 400 to 800). Camera exposures
are generally adjustable in 1/2- or even 1/3-stop increments.
Typically, common aperture numbers are
f2.8, 4, 5.6, 8, 11, 16, and 22, although some lenses will
have larger and smaller apertures than these. This is a good
place to discuss the property known as "depth of field"
because it is directly affected by the aperture size. Depth
of field can be described as the length of the image, measured
from foreground to background, that appears in sharp focus.
To increase the depth of field, use a smaller aperture. An
image shot at f4 will have much narrower depth of field than
an image shot at f11; for everything to be in sharp focus,
try a very small aperture (f8 on the point and shoot cameras
and f16 or 22 for SLR's (Single Lens Reflex cameras), as a
starting point).
It's a real challenge to get good depth
of field on close-ups. One reason is that the closer the lens
is to the subject, the smaller the depth of field. Compensating
for this requires using extremely small apertures to achieve
decent depth of field when shooting close-ups. The other reason
is that with each halving of the aperture its size doubles,
so the shutter speed has to double to keep the brightness
of the exposure consistent. For example, assume that you are
trying to take a photo where the light meter reads f4 and
1/500th is an accurate exposure.
To get more depth of field, the aperture is reduced to f8,
a two-stop change. The shutter speed must then be slowed down
by two-stops to 1/125th
of a second (from 1/500th
of a second to 1/250th of
a second to 1/125th of a
second) to allow the same amount of light to hit the sensor.
With SLR's an aperture setting of f8 results in a narrow depth
of field when the lens is only a few inches from the subject.
If an aperture setting of f22 is used to increase the depth
of field, a three-stop difference from f8, the shutter speed
drops all the way down to 1/15th
of a second (1/125à1/60à1/30à1/15).
At 1/15th of a second any
movement will blur the image- this is the main reason that
close-ups are such a challenge. It's almost impossible to
hold a camera by hand at such slow shutter speeds without
moving; using a good tripod or providing more illumination
by the use of a flash or strobe is key to getting a shot in
sharp focus.
 |
A Gobiosoma oceanops perched on blue mushrooms. Note
here that most of the mushrooms and all
parts of the fish are in focus. A very small aperture (f22)
was used to achieve this amount of depth of field.
Back to our challenge of getting sharp
photos of the Tangs and Wrasses and Angelfish - since the
fish are moving quickly, it's best to use shutter speeds around
1/125th of a second or faster,
if possible. That usually means shooting "wide open,"
at the lens' maximum aperture, because even bright metal halides
simply don't provide enough light to accommodate really fast
shutter speeds. The maximum aperture setting allows the most
possible light through the lens. To achieve this setting,
put the camera in aperture priority mode and select the smallest
available f-stop number (largest aperture), then take a few
pictures. If the shutter speed was fast enough, and if the
focus was accurate, the fish should be in sharp focus. There
is a downside, however, to using the largest or larger apertures:
the depth of field will be very shallow. Sometimes this is
a good thing, such as when trying to isolate the subject against
a background with a lot of distracting detail. When shooting
fish it's best to focus on their eyes, as that's where the
viewer's attention is drawn. As with portrait photography,
it's imperative that the eyes of the subject be nice and sharp.
A series of photos showing how different shutter speeds affect
the sharpness of moving subjects.
If the tank's light is insufficient to
allow adequately fast shutter speeds, then a couple of options
are available. One is to raise the ISO. A film's sensitivity
is a set value, but on digital cameras this sensitivity can
be adjusted. It's important to remember that the higher the
ISO, the "grainier" the image will be. As with aperture
and shutter speed adjustments, each halving or doubling of
the ISO corresponds to a one-stop change; changing the ISO
from 200 to 400 buys one extra stop of speed or depth of field.
If the fish is moving too fast to get sharp shots at 1/125th
of a second using an ISO of 200 and the maximum aperture,
try changing the ISO to 400 and use a shutter speed of 1/250th.
Most modern cameras will provide very good images at an ISO
of 200, but at a setting of 400 the grain becomes somewhat
apparent. At 800 it can be very obvious, so it's a
matter of compromise - image sharpness versus overall image
quality.
A Powder Blue Tang (Acanthurus leucosternon) swimming
quickly across the tank. A relatively fast shutter speed was
used to keep the fish sharp, and since that required a large
aperture (f2.8), the background is not in focus.
A second option in situations where the
tank's light is insufficient is to supplement the lighting
with a flash. The obvious benefit of a flash is that it provides
the extra light needed to support the faster shutter speeds.
But extra light has other benefits, too: it brings out the
fishes' bright colors, and it evens out the shot's overall
lighting. With only the tank lights working, the photo will
show very bright spots and very dark spots; the flash helps
to fill in the dark areas. When done well, the overall effect
is a more balanced exposure.
An external flash (a flash unit that fits
into the hot shoe at the top of the camera) is far superior
to a built-in flash. Most of these tips, however, apply even
to a built-in flash. The first thing to keep in mind is that
the camera must be pointed either slightly downward or upward
or to the left or right relative to the aquarium's glass to
prevent the flash from reflecting off the tank and back into
the lens.
A Mandarin Goby (Pterosynchiropus splendidus) photographed
using a flash.
If the camera allows both the shutter speed
and aperture to be set (manual exposure mode) the flash's
full benefit can be utilized. Set the camera to manual exposure;
a good starting point is f4 and 1/90. The actual burst of
light from the flash is extremely fast (1/500th
of a second or faster), which is why it freezes the fishes'
movement, and it's an effective way to enable a shutter speed
fast enough to avoid "camera shake." Experiment
with different combinations of shutter speeds and aperture
sizes to find out which work best.
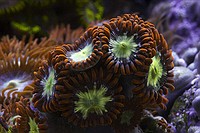
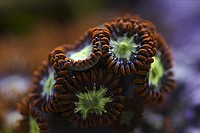
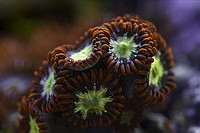
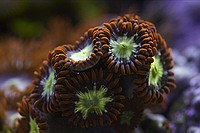
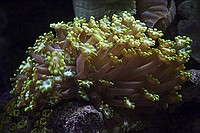
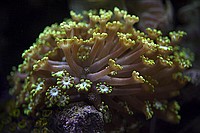
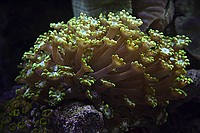
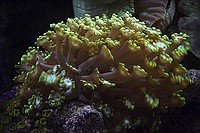
A series of photos showing how the aperture setting affects
the depth of field.
Experimentation may reveal that the flash
is putting out too much or too little light. If so, then the
flash exposure compensation (fec) can be adjusted. The camera's
manual should explain how to do that. Negative fec will reduce
the amount of light the flash generates; conversely, positive
fec increases it. If the camera does not have a manual exposure
mode or flash exposure compensation, the best bet is to make
any necessary exposure adjustments by setting exposure compensation.
Exposure compensation is different from fec in that it increases
or decreases the brightness of the entire image as opposed
to increasing or decreasing only the flash's output.
Many cameras also have a program mode.
In this mode the camera will set the flash to act only as
a supplement to the existing light source. This mode can provide
a nice, natural look to the images, with the downside being
the decreased control over depth of field. In manual exposure
mode the flash acts as the main light source.
As with all types of photography, decreasing
the size of the aperture (by increasing the f stop value)
increases the depth of field. This knowledge can be used to
manipulate the depth of field to the desired goal. Just remember
that there's always a compromise between ideal depth of field
and adequate shutter speeds - it's up to the photographer
to determine the best compromise. Generally speaking, portraits
(people, fish or whatever) are shot with large apertures to
minimize depth of field and focus the viewer's attention on
the subject's eyes. For portraits of fish, however, it is
usually a good idea to have the subject's entire body in focus,
and this frequently requires the use of smaller apertures.
To get great images… experiment.
Practice, practice, practice! Trial and error is the best
learning tool; the more you practice, the better you'll get
- I promise!
|


)
)
)
)