|
Like many aquarists, I have spent hours
on end watching my aquarium. The diversity of animals living
in the glass box in my living room is a constant source of
amazement for me. For the first two years I had a reef tank,
it seemed I could find a new critter each and every time I
spent more than five minutes looking. I've also spent hours
with a magnifying glass examining the smaller animals that
live on the rocks and in the substrate near the glass. These
magnified examinations showed me a whole new range of animals
that had previously escaped my notice. Even with all the animals
I had found with my own eyes and a magnifying glass, I was
still shocked at the number and variety of fascinating animals
living in my system that could only be seen and appreciated
through a microscope.
Microscopes range in price from $20 children's
toys to $75,000+ research lab equipment. I bought my first
microscope the same way I purchased my first digital camera.
I did some research over the web and learned about the basic
types of equipment and price ranges. I eliminated both the
toy scopes (knowing they would be useless) and the high-end
scopes (knowing they would be overkill). I wanted my first
microscope to be a moderately priced piece of equipment that
was good enough to give me an idea of whether or not I would
enjoy microscopy without breaking the bank. (Pretty much the
same way I took up reef keeping: I started with a thirty-gallon
acrylic tank and upgraded to my current setup after I was
sure that I liked being an aquarist.) In the case of the microscope,
my first purchase was a National model 138 (which was listed
as a high school level scope) that I bought online for about
$250.
Microscopes, like any good camera, are
all about the quality of the optics. Obviously, the quality
of the image from a $250 microscope is not in the same league
with a microscope costing $2,500 or more. While my $250 microscope
would not be appropriate for someone who had to spend hours
on end staring into it, for casual use in a hobby situation
it has been ideal. I've been using my National scope for three
years now and I've had lots of fun and learned more than I
could have imagined. The following are some of the photographs
I have taken through the eyepiece of my microscope using a
digital camera.

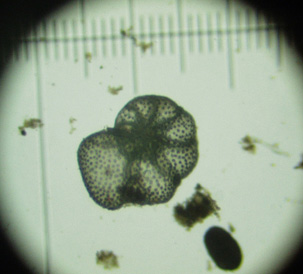 |
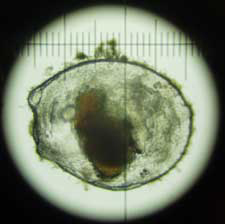
Foraminiferan test-
This calcium carbonate shell enclosed a single celled
amoeba which extended slender pseudopods from the
pores in the shell. These shells look like delicate
works of art through the microscope.
|
|
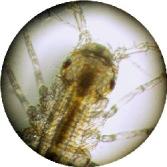
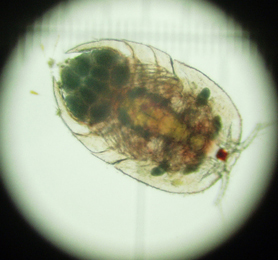
Harpacticoid copepod-
The single red eye helps identify this animal as
a copepod. The first time I saw one of these, I
was reminded of a trilobite.
|
 |
 |
Hydrozoan jellyfish-
This little guy is smaller than the period at the
end of this sentence. It was fun to watch him pulsing
around in the Petri dish. He is photographed against
strands of Bryopsis.
|
|
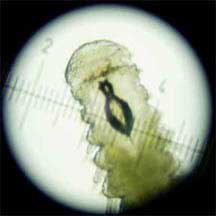
Bivalve-
The transparent shell allows you to clearly see
the internal organs of this bivalve.
|
 |
 |
Polychaete worm-
This closeup of a transparent polychaete worm shows
the jaw structure that resembles pliers. I could
watch this worm exert the jaws, grab a food particle
and pull it back inside.
|
|
Rotifer-
The name means "wheel-bearer" and after
seeing a live one under the microscope you know
why. These animals have what look like spinning
wheels on their head that create a water current
that draws food particles into the mouth.
|
 |
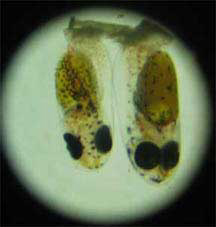 |
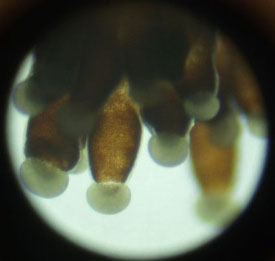
A. percula larvae-
You can clearly see the yolk sacs and eyes on these
eight day old clownfish larvae. They are still encased
in their transparent egg shells.
|
|
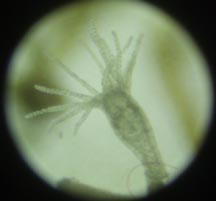
Hydroid-
I found quite a large population of these tiny hydroids
living on the walls of my sump along with sponges.
|
 |
 |
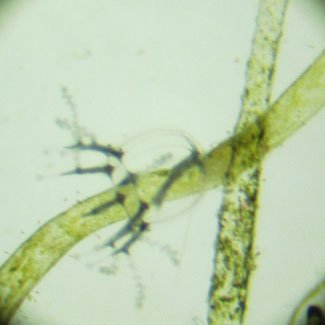
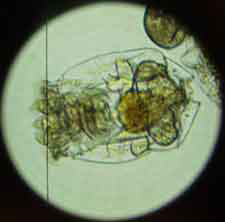
Mite-
This is a true relative of terrestrial spiders that
I found in the debris at the bottom of my sump.
After seeing the number of animals living in my
sump debris, I no longer "clean" my sump!
|
|
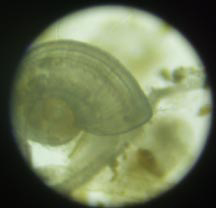
Snail-
I frequently find empty shells from this type of
snail when I examine substrate from my tanks.
|
 |
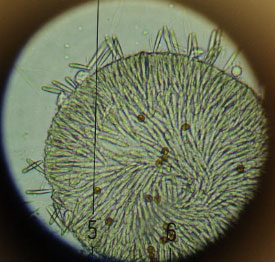 |
Pocillopora polyp-
This 30X magnification of a Pocillopora polyp
shows the round white acrospheres at the end of
each tentacle.
|
|
Pocillopora acrosphere-
One acrosphere flattened beneath a cover slip shows
hundreds of nematocysts. The golden brown objects
are zooxanthallae.
|
 |
If you have been considering the purchase
of a microscope to get yourself started in this fascinating
world of discovery, here are just a few of the basics.
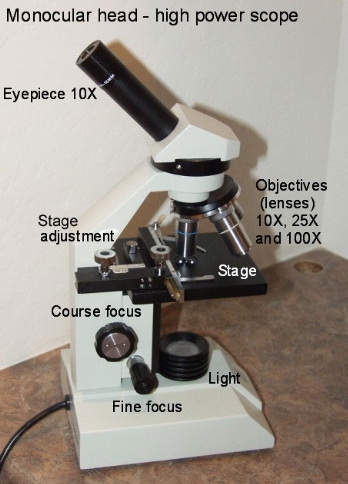
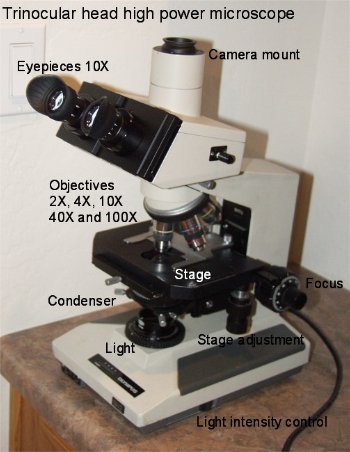
High-Power vs. Low-Power:
The two basic types of microscopes are
high-power and low-power.
High-power microscopes generally have three
to four distinct magnifications: 40X, 100X, 400X and sometimes
1000X. High-power scopes are used to look at very small things
such as single cells or bacteria that are mounted on a microscope
slide. Microscope slides are pieces of clear glass approx.
75mm long, 25mm wide and 1mm thick (3"x1") and are
generally used with cover slips. Cover slips are pieces of
glass approx. 22mm square and .17mm thick. (Cover slips are
VERY thin and VERY easy to break!) For a simple "wet
mount", a drop of water is placed on the slide and a
cover slip is placed over the top of the drop. The slide is
then placed on the stage for viewing. Since the lighting on
the high power scope comes from below the specimen, the specimen
needs to be transparent. (Fortunately, most of the very small
animals are, for the most part, transparent.)
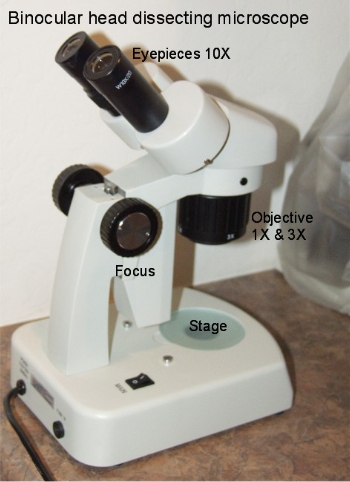
Low-power microscopes (also called dissection
or stereo microscopes) are used to look at larger objects,
such as grains of sand or small animals such as brine shrimp
or small starfish. (By the way, they're also handy for checking
the settings on your jewelry or removing splinters from your
fingers!) The specimen is placed in a Petri dish (shallow
glass dish about four inches across) that allows the aquarist
to observe the animal moving around in the water. My low-power
scope has lights above the specimen and below that can be
independently operated, so the specimen can be illuminated,
even if it is opaque. The dual objective lenses produce a
three-dimensional image. These scopes come in a variety of
powers from 10x to 80x, with the most common being combinations
of 10x/35x and 20x/40x.
I own one microscope of each type. If I
my budget had only allowed for one microscope, I would have
chosen the low-power microscope. I frequently fill a Petri
dish with macro algae and substrate from the tank, refugium
or sump and hunt for new critters while watching the isopods,
worms, copepods, nematodes and myriad other animals go about
their business. I also have examined small starfish, brittle
stars, snails, coral fragments and whatever else I could catch,
under the low-power scope. It is amazing to be able to see
the detail of these small animals. I also use the low-power
microscope to find specimens that I want to examine further
under the high-power microscope.
The high-power microscope has been great
for examining small living animals like ciliates and protozoan
as well as coral cells and structures such as nematocysts.
A drop of water and small bit of algae in a depression slide
can contain dozens of single-celled animals swimming around.
(Unlike regular microscope slides that are flat glass, a depression
slide has a circular depression in the center that will hold
several drops of water. Cover slips are generally not used
with depression slides.) I have snipped off tentacle tips
from various corals (Plerogyra, Catalaphyllia,
Pavona) and compared the size and structure of the
nematocysts. A ground up tentacle from an Aiptasia
is ideal for studying zooxanthallae. (Finally, a good use
for Aiptasia!)
Binocular vs. Monocular:
Binocular microscopes have two eyepieces
for viewing. Monoculars have one eyepiece. Binocular scopes
are much easier on your eyes for extended viewing sessions,
but they are more expensive.
Extras:
Supplies - Items
such as microscope slides, cover slips, Petri dishes and basic
dissecting kits (which contain necessary tools like tweezers,
small scissors and probes) can all be found and ordered online.
Mechanical stage - The stage
is the flat surface where microscope slides are placed for
viewing. The least expensive microscopes will simply have
two clips to hold the slide in place. I highly recommend upgrading
to a mechanical stage for a high-power microscope. A mechanical
stage has a spring-loaded arm to hold the slide, and two knobs
to position the slide. One knob moves the slide right and
left and the other moves the slide up and down. Many of the
small critters I have examined move around quickly in their
drop of water and the mechanical stage allows me to move the
slide smoothly to keep up with them.
|
Carrying case
- A plastic carrying case with foam insert for storing
the microscope when not in use will help to insure that
your microscope does not get damaged.
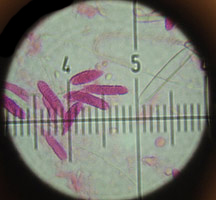
Reticle
- Is a special eyepiece that has an inscribed scale
(right) that allows you to measure the specimens
you are viewing.
|
 |
Photography:
The pictures that I took in
this article were shot using an Olympus E-100 digital camera
mounted to a tripod with the front lens of the camera directly
against the eyepiece of the microscope. This system works
for me because the viewfinder of my digital camera has through
the lens metering and a pretty good zoom lens. I look through
the camera, into the microscope and use the focus on the microscope
to adjust the fine focus on the image I am photographing.
The major drawback of photographing in this manner is that
I am not able to capture the entire microscope image in the
camera. I get a narrower field of vision through the camera.
This means that sometimes I have to switch down to a lower
magnification lens in order to capture the whole specimen
I am trying to photograph. While this system is certainly
not ideal (or even elegant), it works and I have been able
to take pictures to share on my website.
In Conclusion:
I would certainly recommend
either of these National microscopes to anyone getting started.
They are reasonably priced, easy to use and will provide a
window into a fascinating new world. (They are available at
www.microscopeworld.com)
Be forewarned, those of you
who decide to get yourselves a starter microscope. If you're
anything like me, you could become obsessed with the unseen
world and find yourself looking to upgrade your microscope
one day. As it happens, my upgrade arrived last week. It is
a used Olympus BH-2 that I bought from a veterinary pathologist.
(And, yes, it ended up being about nine times more expensive
than my National scope.) Buying a more sophisticated piece
of equipment opens up a whole new "can of worms",
as they say. You would be surprised at the variety of types
of microscope configurations available! You have to learn
a whole new set of terminology regarding lighting and optics;
then, of course, is the five hundred page book you have to
read in order to learn to use the thing. But, so far I'd have
to say the added expense and complexity has been well worth
it considering the quality of the images. (And heck, I don't
even really know how to use it yet.) However, if I had not
been using the starter scope for the last three years, I'm
not sure I would truly appreciate the resolution and clarity
of the images my new microscope provides.
 |
Now this is a microscope!
It weights over twenty pounds and has more knobs than
I can shake a stick at. I still have to purchase an
adapter for my Canon F-1 camera, so I'm shooting pictures
with the digital camera through the eyepiece. I can't
wait to be able to take proper pictures of the whole
field using the trinocular head!
|
Here's a sample of a munnid
isopod photographed through my Olympus microscope.
Awesome, huh?
|
|
|
|