|
Aquarium Electrical
Systems
Electricity and saltwater do not mix well;
nevertheless we aquarists need to use a lot of electricity
to run our systems, so safety is something that should always
be kept uppermost in our minds. Putting power strips and ballast
transformers under a tank can be a costly mistake. You only
need one leak, a few drops of saltwater, and some of your
equipment may be ruined or even worse, cause a fire. Another
issue that should be considered is your tank's effect on your
power bill. In this case, aquarists need to think about efficiency,
because the more efficient something is, the less power it
will use. We will want to concentrate on things like pumps
that run 24/7, as well as high power lighting systems that
may run many hours a day.
Understanding Electrical Power
Power is what makes your meter spin and
is calculated in watts. To determine how many watts a device
uses, look for the amount of current it draws. This will be
rated in amps. To calculate power, just multiply the voltage
the device uses in volts by the current it uses in amps. Most
of the things we use run on 120 volts AC (VAC). If we have
a 120VAC pump that draws 3.5 amps, then it consumes 420 watts
of power. To convert this to cost, you will need to multiply
the instantaneous power by time. Your power bill is rated
in kilowatt-hours (KWH). Our pump that draws 420 watts uses
0.420 KWH every hour, 10.8 KWH every day, and approximately
312 KWH per month. If the power company charges $0.06 per
KWH, then the pump is costing us $18.75 per month to run.
(((120 X 3,5) X 24 X 31) / 1000) X 0.06 = 18.75. Now that
we can figure out how much a device is costing us to run,
we can compare different devices to pick the one that will
cost us the least to run. If we look at the pump that draws
3.5 amps and pumps 2000 gallons per hour (GPH) and compare
it to another pump that pumps 1800 GPH and draws 3.3 amps
(((120 X 3.3) X 24 X 31) / 1000) X 0.06 = 17.68 we can see
what the cost difference will be. An easier way to look at
this may be to compare amps to GPH, because they both run
on the same voltage and for the same amount of time per month.
That is 2000 / 3.5 = 571 GPH per amp and 1800 / 3.3 = 545
GPH per amp. This comparison shows that the 2000 GPH pump
moves more water for the money (26 GPH per amp), than does
the 1800 GPH pump. The 1800 GPH pump costs less to run for
the month, but it is less efficient. Differences in efficiency
may be more apparent on ballast transformers. The ballast
also has an amp rating. A 250 watt MH ballast that draws 2.6
amps at 120 VAC is drawing 312 watts in, yet producing 250
watts output. The 62 watts difference will be turned into
heat. A different 250 watt MH ballast that draws 2.2 amps
at 120 VAC is drawing 264 watts, so only 14 watts will be
turned into heat. The 2.2 amp ballast transformer may cost
more to buy, but you can work out the monthly cost as was
done for the pump, and you will be able to determine how long
it will take to save the cost difference.
GFCI Outlets and Your Aquarium System
It is my belief that all aquarium equipment
should be on GFCI outlets. A day may come when a GFCI may
save your life. Get a good one that replaces a wall outlet.
It will have a line side, and a load side. The line side connects
to the wires from the breaker panel, and the load side connects
to the rest of the normal outlets on the circuit. The GFCI
outlet also protects the outlets that are on the load side.
When GFCI outlets get old, they tend to trigger easily. If
you have one that does this, replace it so that it does not
trip and shut your tank down. You may want an electrician
to install them for you, so that you don't get shocked trying
to protect yourself.
Notice: If you are not completely comfortable
working with electricity, then for your safety, and that of
your family and tank, get a professional to wire it for you.
Constructing an Automatic
Top-Off System
A float switch can be used to run a powerhead in a water container,
or a solenoid valve on an RO/DI system, or an elevated storage
tank. Set the float switch to the normally closed (NC) mode.
When the water level in your sump goes down, the float switch
will close, which will cause your top-off pump or solenoid
to run until the water raises enough for the float switch
to open. If you are using a container of top-off water with
a pump or powerhead in it, then it is a good idea to put a
second float switch in the container, so that your pump or
powerhead does not run dry. This float switch should be set
to normally open (NO). To change the float switch from NC
to NO just remove the plastic clip on the bottom of the switch
tube and slide the float off, flip it over and put it and
the clip back. That is all that is required to change it.
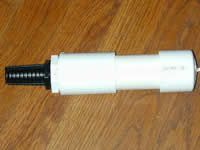
I drill a hole in the center of a PVC pipe cap for the top
of the float switch and wires and four small holes for vents
so the assembly does not get air locked. Don't forget to shut
down your automatic top-off device when you are performing
water changes to your tank.
Parts List:
Solid-state Relay NO with a 3 - 32 VDC coil and a 120 VAC
@ 3 amps
Full wave bridge rectifier
2 K ohm 1/2 watt resister
Three wire power cord
Float switch Grainger 2A554, McMaster 50195K65
Duplex outlet
External duplex outlet box

 |
 |
 |
|
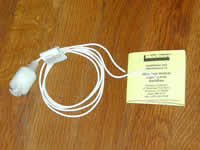
Float Switch
|
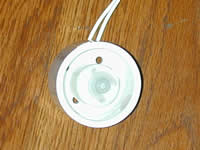
Float Switch in a 1 1/4"
PVC pipe cap. (inside)
|
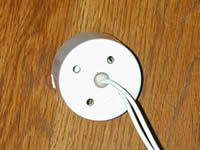
Float Switch in
a 1 1/4"
PVC pipe cap. (outside)
|
 |
 |
|
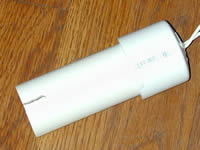
Float switch setup for the RO/DI container
to protect the pump from running dry.
|
Float Switch setup for the tank with
a PVC coupling with a 1 1/4" X 1" FNPT bushing
and bulkhead strainer so no snails or fish can push
on or jam the float switch.
|
Constructing
a Low-water Pump Shutdown System
A float switch can be placed in your sump so that if the water
gets too low, the circulation pump will be shut down. This
can solve two problems. If the reason the sump is low is because
there is a leak somewhere, then it is best to stop pumping
water into it. Also, it will protect your pump from running
dry. The relay will handle a load of up to 3 amps. This is
enough to carry a fairly large pump. If your load is larger,
then use the alternate relay, which is good for up to 10 amps.
You will want your float switch set to normally open (NO)
mode. If the water level in your sump gets too low, the float
switch opens, and the circulation pump stops. The reason this
design is more complex than the top-off is because we don't
want the pump to be restarted from water that siphons back
from the tank, as this would cause the pump to turn on and
off. It could do this repeatedly for quite some time, causing
damage to the pump. The reset circuit will prevent this from
happening. To restart the pump, simply press the reset switch.
Parts List:
Solid-state Relay NO with a 3 - 32 VDC coil and a 120 VAC
@ 3 amps
Full wave bridge rectifier
2 K ohm 1/2 watt resister
Three wire power cord
Float switch Grainger 2A554
Duplex outlet
External duplex outlet box
Push Button
Using X10 to Control Electric
Devices for Your Aquarium
X10 is a method used to command electrical devices over the
electrical wiring in your house. Several aquarium controllers
use X10 appliance modules to control lights, heaters, chillers,
and many other things. You can also get X10 controllers, which
you load from your PC, that will run lights and pumps automatically.
The thing to remember is that the electrical wiring in your
house can be very noisy and the X10 communications system
is not very error resistant. Under these conditions this could
mean that your system directs a module to come on, but it
does not hear the command, so it does not come on. It can
also mean that noise has triggered it to come on when the
controller did not command it to turn on. This is the main
disadvantage to the X10 power control system. Some controllers
re-send the commands on a regular basis as a means to overcome
this problem. Sometimes, you can get involved in X10 conflicts
with your neighbors. For example, if a neighbor is using the
same house code as you are, you can inadvertently turn each
other's X10 modules on or off. Try changing your house code
for the controller to solve this problem. If that does not
work, then filters are available which will eliminate this
conflict. If some of your modules respond, and others do not,
try turning on an electric oven or electric clothes dryer.
If this fixes your problem, you need a phase bridge. The phase
bridge couples the X10 commands between the two 120VAC phases
that make up 220VAC. There are several types of X10 modules
that are useful. A PL-513 is used to connect your controller
to the house wiring. It transmits the X10 commands from the
controller into the house wiring. A PL-523 transmits and receives
X10 commands to and from the house wiring. The AM-466 three-wire
appliance module is the one you will use the most for pumps,
lights, heaters, etc. Do not use the LM-465 two-wire lamp
module for anything but incandescent lamps.
Places to get the components for these projects:
Float switches:
www.grainger.com
(You must have a business account to buy from Grainger)
www.mcmaster.com
Solid state relays:
www.hosfelt.com
You will want relays that are normally open (NO) for these
projects.
Electronic Components:
Radio
Shack
X10 modules and controllers:
Radio Shack, Home Depot, Lowes...
www.x10.com
X10 plug-in modules
www.hometech.com
Wire-in Levaton X10 products like phase bridges, X10 wall
outlets and wall switches.
Photo Credits:
All photos courtesy of Jon Garner.
Disclaimer:
Construct these projects at your own
risk. The author, Reefkeeping Magazine and Reef
Central will not be responsible for any damage or injury caused
by improper construction of these devices. The combination
of electricity and water can be deadly, so please use common
sense or consult a professional electrician if you do not
have the proper experience.
|